

Latency-based Routing & Region Failover with Route53
Never worry about region outages anymore by using an active-active Failover setup that doesn't even come with a lot of additional costs.


Looking at your operational tasks if you’re running a serverless application on AWS is mostly very enjoyable — generally, there’s not much that can break or cause interruptions. No containers to suddenly stop working, no resource limits that are easily breached. But still, there are events that can cause your service to have an outage — regardless if it’s your own fault for deploying a faulty version or if there are issues with AWS’ data center — your customers are affected.
A good enhancement is to extend your application to span multiple regions. If all of your components are serverless and therefore on a pay-per-use pricing model, this comes with an almost zero increase in costs.
A quick glance at what we’ll cover in this article:
An overview of our target scenario & its requirements
Adding Custom Domain Names for our API Gateway
Setting up latency-based DNS entries
Adding health checks for our application
Enhancing our DNS entries with our health checks
Key Takeaways About the solution
We’ll set up our infrastructure solely with Serverless Framework and custom CloudFormation resources.
Target Scenario & the Requirements
This is what we want to achieve:
making our API available in multiple regions.
routing requests based on the customer’s location to the nearest region.
tracking the health of each region.
automatically removing regions from the latency-based routing if they are unhealthy.
The target architecture will therefore heavily make us the features we get with Route53: health checks & DNS records with the routing policy Latency.
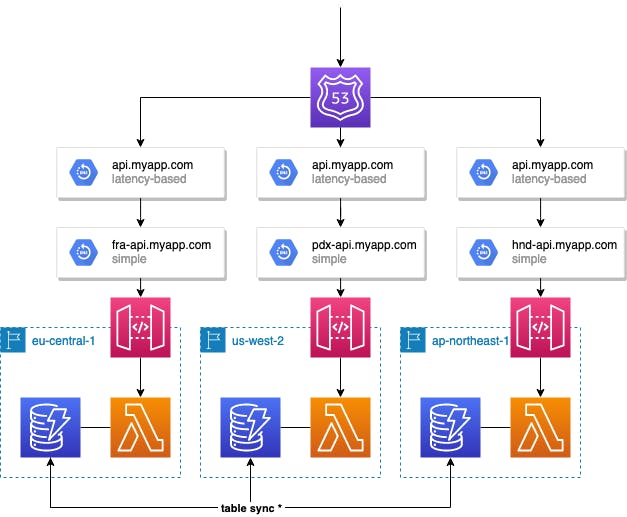
We’ll also create a health check for each region, which will validate that our application health endpoint is reachable and returns HTTP 200. Then we’ll use those at our latency records.
If a health check is transferred into an alert state, Route53 will remove this record from the routing. So if you’re making a request from a location near Frankfurt (eu-central-1), but the health check for this region is marked as unhealthy, Route53 will still resolve the DNS lookup to either us-west-2 or ap-northeast-1.
💡 Regarding Table Sync: this is only an example of using DynamoDB. You don’t have to create tables for every region and enable sync for them. You can also have just one table in one specific region and do cross-origin requests from your functions. This will slightly reduce performance and won’t completely separate your regions, but keeps your costs low.
Adding Custom Domain Names to our API Gateway
If you’ve already used Custom Domain Names, you can skip this part.
At first, we want to add custom domain names to our HTTP API Gateway. A prerequisite for this is that you’ve added your certificate to AWS Certificate Manager. We’ll be using regional endpoints at the Gateway, so it’s necessary that our certificate is available in all of our regions.
For the actual setup, we’ll be using the Serverless Plugin serverless-domain-manager, which makes life quite easy. I’m using myapp.com as my domain name, as well as $STAGE_NAME-api.myapp.com for my regional endpoints and api.myapp.com as my global endpoint, which will later receive the latency-based routing policies.
plugins:
  - serverless-domain-manager

custom:
    certificateName: myapp.com
    regionalDomain: ${opt:stage}-api.${self:custom.certificateName}
    domain: api.${self:custom.certificateName}
    customDomains:
      - http:
          certificateName: ${self:custom.certificateName}
          domainName: ${self:custom.domain}
          basePath: ''
          stage: ${self:provider.stage}
          endpointType: 'regional'
          createRoute53Record: true
          securityPolicy: tls_1_2
      - http:
          certificateName: ${self:custom.certificateName}
          domainName: ${self:custom.regionalDomain}
          basePath: ''
          stage: ${self:provider.stage}
          endpointType: 'regional'
          createRoute53Record: true
          securityPolicy: tls_1_2
In the example, we’re having the stages fra (eu-central-1), hnd (ap-north-east-1) and pdx (us-west-2), which are the code of the main airports of those regions. ✈️
To add the Custom Domain Names, you need to run *sls create_domain — stage=<stage-name>* once for each region. The plugin will then take care of creating the custom domain names.
You’re probably asking: why do we need the api.myapp.com as well as the stage-specific DNS entries for every region? If you’re not adding the main entry for each region, you’ll later receive TLS handshake errors because the region is not configured to receive requests for this domain. Even though api.myapp.com will later resolve to our region-specific entry, e.g. fra-api.myapp.com, the handshake will still target api.myapp.com and verify that this is a configured alternative domain name at this endpoint.
After deploying your actual stage with Serverless, the plugin will take care of attaching your deployment stage to the custom domain names.
Adding latency-based DNS Entries
Let’s extend our DNS setup by adding Record Sets for each region via CloudFormation which are based on the latency to the origin of the request.
resources:
  Resources:
    LatencyBasedRecord:
      Type: AWS::Route53::RecordSet
      Properties:
        ResourceRecords:
          - ${self:custom.regionalDomain}
        SetIdentifier: ${self:provider.region}
        HostedZoneName: ${self:custom.certificateName}.
        Name: ${self:custom.domain}.
        TTL: 60
        Region: ${self:provider.region}
        Type: CNAME
If you remember, the regional domain will point to the Gateway of our region, for example, fra-api.myapp.com. But the CNAME of the record we‘re creating will be api.myapp.com. So for our case, we’re creating 3 records, all with the same CNAME but with different targets. Route53 will take care of resolving DNS queries correctly based on the origin of the request.
Creating Health Checks for our Application
Route53 now automatically selects the region with the fasted latency for our customers. But what if the fastest region is not available because our application is not healthy? We surely want to fall back to another region, even if it’s not the optimal one based on the request duration.
In the first step, we want to monitor that our region is healthy, which means that a specific path returns HTTP 200. In my example, I’ve set up /system/health as a path for this, but you can pick whatever you like. If you’ve configured Authorizers for your function, make sure that this path is publicly accessible.
resources:
  Resources:
    LatencyBasedRecord:
      # [...] record we're created in the previous step
    RegionHealthCheck:
      Type: AWS::Route53::HealthCheck
      Properties:
        HealthCheckConfig:
          Port: 443
          Type: HTTPS
          ResourcePath: '/system/health'
          FullyQualifiedDomainName: ${self:custom.domain}
          RequestInterval: 30
          FailureThreshold: 3
          Regions:
            - eu-west-1
            - us-west-1
            - ap-northeast-1
        HealthCheckTags:
          - Key: Environment
            Value: ${opt:stage}
Route53 will now do a health check every 30 seconds from all of our configured regions. You can omit the region configuration, so all health check regions of Route53 will be used (there are a lot), but you can’t configure less than 3 regions.
What if I’m using multiple Lambdas to provide my API?
If your application consists of multiple Lambda functions, which are exposed via the API Gateway, you can create multiple health checks and aggregate them later via a calculated health check.
Extending our Records with our Health Checks
Now we’re having our health checks, but without any purpose yet. Let’s integrate them into our DNS records with an additional configuration on our Record Set with HealthCheckId.
resources:
  Resources:
    LatencyBasedRecord:
      Type: AWS::Route53::RecordSet
      Properties:
        ResourceRecords:
          - ${self:custom.regionalDomain}
        SetIdentifier: ${self:provider.region}
        HostedZoneName: ${self:custom.certificateName}.
        Name: ${self:custom.domain}.
        TTL: 60
        Region: ${self:provider.region}
        Type: CNAME
        HealthCheckId: !Ref RegionHealthCheck
    RegionHealthCheck:
       # [...] our health check configuration
If you’re having a look at the documentation for AWS::Route53::HealthCheck, you’ll see that it exposes the identifier of the health check after creation. That’s why we can easily reference it via CloudFormation’s !Ref function.
And there we go. Customers will now be automatically routed to the fastest region, but only if the region is healthy. You can validate it by using nslookup our created DNS records for api.myapp.com. If you’re not having a VPN provider to test requests from different locations, just break the code of the Lambda function of your closest region to see that Route53 will take care of and resolve your lookup to another region that is healthy. 🎉
Key Takeaways
AWS’ services and capabilities, in combination with the ease of adding infrastructure via Infrastructure-as-Code tools like Serverless Framework or CloudFormation, enable you to offer better availability and latency for your customers with very small efforts. Our solution also takes advantage of the serverless’ pay-per-use pricing model, not resulting in a lot of additional costs.
💡 Last note: Surely this solution is not only applicable to Serverless Applications but all other kinds, but this comes with additional costs of running more containers/instances.