


Table of contents
- Introduction
- Prerequisites
- Terraform AWS Lambda Setup
- Conclusion
- Improvements
- Wrap Up
- Are you interested in more?
- Frequently Asked Questions
One of my favorite AWS Services is Lambda, the powerhouse for serverless computing. But one can get easily lost in the AWS console when you just want to update or deploy your lambda function. That's why we are looking into doing this in a more "infrastructure as code" approach using Terraform.
Introduction
Before we dive into the details, our goal is to provide you with a comprehensive guide to AWS Lambda, covering all the essential aspects you need to know.
Overview of AWS Lambda
What is AWS Lambda? I am going to keep this short and sweet. It's your business code running inside a function deployed to the cloud, running on someone else's hardware.
You don't need to manage servers or anything else but instead can focus on developing your business logic. The benefit here is that you pay only for invocation time in contrast to a server where you will pay every hour that it is online.
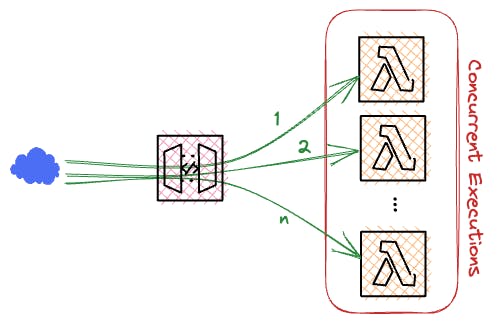
Also, you can easily implement an event-driven architecture, where your business code is only run (and billed) when it is reacting to an event such as an HTTP request, or a workload in your queue to process.
To illustrate this, let's say you have a service that returns the current week to the user. If we put this on a server, we would need to provision the server, think about a patch strategy, keep the server up to date, deploy our software on it, and expose the service with a reverse proxy (To be fair, you could use an Application Load Balancer for that). The list goes on and on.
The selling point of AWS Lambda is that you don't need to think about all of that you can focus on your business logic and then package it up and deploy it as a Lambda function. Thanks to one of the newer additions to AWS Lambda, you can even expose your lambda function through a function URL (more on those), eliminating the need to put the Lambda behind an API Gateway.
Quick TLDR: AWS Lambda is a service that handles serverless workloads, you write your business logic, deploy it and AWS handles the rest. You only pay when it runs.
Introduction to Terraform
Terraform is a tool developed by Hashicorp to implement infrastructure as code.
The days of angry clicking in the AWS Console were over when Terraform was released back in. The other alternative you had back then was writing CloudFormations yaml's or doing click-ops in the AWS console. Nowadays there's a wealth of tools that can help you get your AWS Account under control and deployed externally, without having to log into the Console and click your way through.
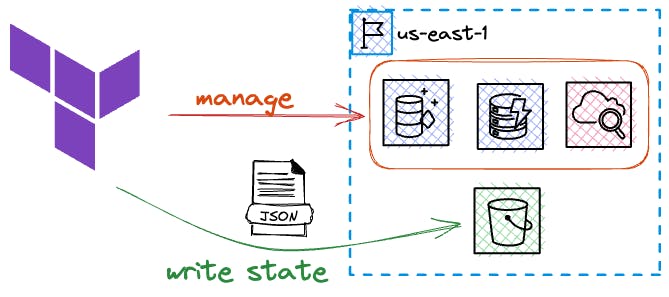
Terraform doesn't produce a CloudFormation template that you can destroy when you are done with it, instead, it tracks all deployed resources and resource lookups in a state file that can either live locally on the developers' machine or even better be stored in a storage backend like s3.
It is fast to iterate with Terraform and it supports creating your own modules, so you can structure your infrastructure to match your application. Behind the scenes, Terraform (or rather the AWS provider) implements creating, managing, and deleting resources through AWS API calls.
On top of that, it provides a generic interface so you can write your own provider for your use case. There are plenty of open-source modules out there for a wealth of SaaS or Cloud providers. We will be using the AWS provider in our example.
Benefits of Using Terraform with AWS Lambda
The instant benefit is that you don't need to navigate the AWS Console to deploy and update your lambda functions. You can co-locate your infrastructure code with your application code. This means you don't need to leave your terminal to do deployments. Congratulations, you have just unlocked Infrastructure as code.
Prerequisites
Let's clarify what we need before we can get started with working with Terraform.
It won't take long, I promise.
AWS Account Setup
Before we begin, please make sure that you have AWS access in your local terminal.
If you don't have that, please look into tools like aws-vault or the easier route: install the AWS-CLI and use AWS login. Then enter your AWS Access Key and Secret key and please don't use the Keys from your root account. You should have a dedicated user account. We are not covering IAM and AWS Account safety here in full detail but please, please have a MFA on your root account.
Terraform Installation and Configuration
Depending on your operating system, download the relevant terraform binary from the official terraform website and put it into your $PATH.
You could also use the tool you use to set up your tools on your machine, like brew, nix, or something else. just make sure that terraform is executable before continuing. (Spoiler, we will need it very soon)
Here's the link to the Terraform install page. https://developer.hashicorp.com/terraform/install
Basic Understanding of AWS Services and Terraform
As I've already outlined, the magic ingredient for interfacing Terraform with AWS is the AWS provider which is a very busy open-source project in itself, that gets updated lightning-fast when new AWS services drop. You could say that a provider is a description of how to add, delete, and get information about a resource. In our very specific case of deploying and managing AWS Lambdas, we will create terraform resources in a main.tf file that is written in the terraform configuration language. The language specifics of terraform are easy to grasp but provide a wealth of additional configuration. We will touch upon that a little bit when we get started on our terraform configuration. So let's get started right away.
Terraform AWS Lambda Setup
Let's talk quickly about what we are deploying again to refresh our minds and set the stage. We will deploy a lambda function to our AWS account which is powered by business logic that we can write in our language of choice. AWS Lambda provides a few runtimes by itself, namely NodeJS, Ruby, Python, Go, and Java. We will use NodeJS for today's demonstration but note that you could use any of the other languages. AWS Lambda even allows for custom runtimes which give you the power to use any programming language you want. But since we are just having an introduction here, I'll leave this up to the reader.
Creating the Lambda Business Logic
I am assuming we are on an empty directory, create a file called index.js and put the following code in there. Parts of the audience will groan and say, "Oh no, why JavaScript?", while other parts of the audience will groan and say "Oh no, why not TypeScript?". AWS provides many runtimes including your own custom runtime, that you can create using a docker image. But for the sake of this short tutorial, let's just run with these seven lines of code of JavaScript.
const handler = async () => {
  return "Hello World";
}

module.exports = {
  handler
}
This is just basic boilerplate, it's not pretty but it will help with the demonstration.
As we are in NodeJS territory, run an npm init -f to create a package.json in that same directory. Terraform expects a zip file with the code that makes up our business logic.
As mentioned earlier, in a more elaborate setup, you might have TypeScript code and a build step to create a dist folder with your compiled code, we are skipping the build step for now and just let terraform zip our index.js and use that for our lambda function.
Creating a Terraform Configuration File
Now we have our lambda business logic ready to be deployed. But to start deploying with Terraform, we will have to create a main.tf file and a reference to the provider we will use. Remember, the provider is what helps us create resources and query existing resources.
Create a new main.tf file right into the root of your directory and put this boilerplate code in there.
terraform {
  required_providers {
    aws = {
      source  = "hashicorp/aws"
      version = "~> 4.0"
    }
  }
}

provider "aws" {
  region = "eu-central-1"
}
This will require the AWS provider I spoke about earlier and set the region for that provider to eu-central-1, so yeah we will deploy to Frankfurt. Feel free to change this to a region closer to you, or just leave it like that. After we have set the provider in the main.tf, we will have to run the terraform init command once in the directory to have Terraform pull all necessary modules/providers we need to be ready to deploy our lambda function.
Defining AWS Resources
Now after everything is ready for us, we need to adjust the main.tf file to specify our lambda function, we can do that just below our provider boilerplate. Please note that we are already heavily using resource references here, but I will explain all of this as we go, so don't worry.
...

data "archive_file" "lambda" {
  type        = "zip"
  source_file = "index.js"
  output_path = "lambda.zip"
}

resource "aws_lambda_function" "lambda" {
  filename      = data.archive_file.lambda.output_path
  function_name = "my-first-tf-lambda-function"
  role          = aws_iam_role.lambda_role.arn
  handler       = "index.handler"

  source_code_hash = data.archive_file.lambda.output_base64sha256

  runtime = "nodejs18.x"
}
In the beginning, we reference our index.js file that we carefully crafted beforehand. Terraform will create a zip file for us, as this is needed for deploying it to an AWS lambda function. Then we reference the output_path of that resource as the filename for our lambda.
We are giving this function a recognizable name so we can find it later on and then.
You notice that we have both a resource and data here. Resources are AWS Resources that we will create in our AWS Account while data are lookups of resources already present, that we want to reference in our resources. The archive_file directive is another provider by Terraform that handles creating archives and providing hashes of the archives for consumption in resources or other data.
The runtime is set to nodejs18.x but we can also specify another version or language that is provided by AWS. You can look up which languages are supported by AWS here. (Lambda Runtimes) For the sake of our tutorial, we will stay on nodejs18.x.
The source_code_hash is an option for lambda functions that prevent deployment of the lambda function when the hash of the zip file is unchanged. So when there's no change in code, there should not be a new deployment. This comes in handy when we are deploying multiple functions and we don't want to trigger a deployment for all functions, but only for those with relevant changes.
We are referencing an AWS Role here, that doesn't exist yet. A lambda function needs to have permissions to interface with different resources. One of the minimal permissions a lambda should have is creating CloudWatch log groups and log-streams to give us logs, invocation details, and errors for our lambda function. Below the infrastructure code for our lambda handler, we can add the following lines:
...

data "aws_iam_policy_document" "assume_role" {
  statement {
    effect = "Allow"

    principals {
      type        = "Service"
      identifiers = ["lambda.amazonaws.com"]
    }

    actions = ["sts:AssumeRole"]
  }
}

resource "aws_iam_role" "lambda_role" {
  name               = "my-first-tf-lambda-role"
  assume_role_policy = data.aws_iam_policy_document.assume_role.json
}

resource "aws_iam_role_policy" "lambda" {
  name = "lambda-permissions"
  role = aws_iam_role.lambda_role.name
  policy = jsonencode({
    Version = "2012-10-17"
    Statement = [
      {
        Action = [
          "logs:CreateLogGroup",
          "logs:CreateLogStream",
          "logs:PutLogEvents",
        ]
        Effect   = "Allow"
        Resource = "*"
      },
    ]
  })
}
The data at the top describes a policy document, this is a good way of creating a dynamic permission as we have access to terraform variables and information exposed by other resources here. Since it's just an assumed role policy document, there's nothing wild in here other than allowing the lambda service principal to assume this role. This is needed to have this role be used by Lambda.
Next up is the specification of the IAM role with a reference to the aforementioned assume role policy. We also give it a name because we also want to keep the name verbose in case we have plenty of other roles in our account.
There are multiple ways to attach policies to a lambda role, I've opted to use the role policy here to create the permissions inline into the role. You could also create a managed policy and then use a policy_attachment resource referencing the managed policy and the role, but I leave that up to you as a small exercise.
These permissions will be enough to be able to deploy the lambda function.
Go to your terminal and issue the terraform plan command. This is one of the cool features of Terraform, it will give you a plan of what it will create and then you can review it and when it all looks good you can go ahead and apply the change with the terraform apply command. This allows an iterative approach, as you can always change the terraform code and then check with terraform plan which resources are changing.
Let's wait for Terraform to apply our changes and then we can visit the AWS console and review our work.
A Word on the State
Please note, that Terraform by default will create a terraform.tfstate file in your directory. Under no circumstances, delete this file after you have issued the terraform apply command. Unlike Cloudformation, we don't produce some sort of stack or organizational tool to note which resources we created with our Terraform code. This lives in your terraform.tfstate file. There are surely improvements to this, such as using the Terraform cloud or managing the state.file in an S3 bucket. For the brevity of this tutorial, we are just running along with our local terraform state file, but for production deployment purposes, please consider reading up on terraform state management. In the improvement section, we shortly touch upon adding a remote state storage using s3.
Configuring Lambda Further
We forgot to add a memory size, timeout, and environment variables to our lambda, let's adjust our lambda code to have these changes deployed. No more clicking in the AWS console, it's all in the code.
When you don't specify a resource property that is deemed optional, then Terraform will set defaults. Out of all options for the lambda function, only function_name and role are required, and everything else is optional. Let's make some relevant adjustments right now.
resource "aws_lambda_function" "lambda" {
  filename      = data.archive_file.lambda.output_path
  function_name = "my-first-tf-lambda-function"
  role          = aws_iam_role.lambda_role.arn
  handler       = "index.handler"
  source_code_hash = data.archive_file.lambda.output_base64sha256
  runtime = "nodejs18.x"

  timeout = 15
  memory_size = 1024
  environment {
    variables = {
      PRODUCTION = false
    }
  }
}
Make sure to replace our current resource with this resource, because Terraform doesn't like duplicate resources.
Setting the memory_size to 1024 is a classic change, as our lambda will have access to more RAM and a better CPU / Network configuration. As always, it's a cost tradeoff, but I've always had a good experience with a 1024MB lambda vs a 128MB Lambda. You can read more about this here.
Run another terraform plan to verify our changes and then you can go and apply them. It shouldn't take long and then you can verify the changes in the AWS Console, or just trust that Terraform did everything right.
Making our AWS Lambda available via a function URL.
You can run your lambda in the AWS Console but it would be cool to also have it exposed on the internet so we can call a URL and get our function output as a result. One of my favorite ways these days is to configure a function URL for lambda. There's a resource we need to add for that.
resource "aws_lambda_function_url" "lambda" {
  function_name      = aws_lambda_function.lambda.function_name
  authorization_type = "NONE"
}
This will generate a random URL owned by AWS that will run our function and return the response to us when it's called. But in order to get the URL to show up in our terminal, we have to specify something called a terraform output. If we want to do infrastructure as code, then we would also want to have the relevant information printed out where we apply the infrastructure code.
Let's specify an output right now.
output "function_url" {
  value = aws_lambda_function_url.lambda.function_url
}
As you can see, it starts with the top-level declaration of output "identifier" and then exposes the function URL, that is an attribute of the aws_lambda_function_url resource.
You can issue a terraform apply now and then you should have received a random URL from AWS that you can call and have the response of your lambda code returned to you. Isn't that neat?
Specifying Different Event Sources for Your Lambda Function
Subscribing to an SNS Topic with Lambda
Terraform makes it easy to specify other event sources for your lambda. The function URL doesn't count as a real event source as it's not another resource but rather an API Gateway managed by AWS that is hidden from you. If you wanted to make your lambda react to a topic by making a subscription to it you could do it like this.
We can either reference an existing topic or create our own.
data "aws_sns_topic" "lambda-topic" {
  name = "lambda-topic"
}

...

resource "aws_sns_topic" "lambda-topic" {
  name = "lambda-topic"
}
Feel free to be more creative on the actual topic name.
And now, we would want to adjust our lambda, to be a subscriber to the SNS topic.
resource "aws_sns_topic_subscription" "lambda_subscription" {
  topic_arn = aws_sns_topic.lambda-topic.arn
  protocol  = "lambda"
  endpoint  = aws_lambda_function.lambda.arn
}

resource "aws_lambda_permission" "allow_sns" {
  statement_id  = "AllowExecutionFromSNS"
  action        = "lambda:InvokeFunction"
  function_name = aws_lambda_function.lambda.function_name
  principal     = "sns.amazonaws.com"
  source_arn    = aws_sns_topic.lambda-topic.arn
}
The lower part of this seems a bit unusual, but essentially, you must explicitly allow the actual SNS service to be able to invoke your lambda. This happens behind the scenes if you create them through the Console. Now, your Lambda will be invoked, every time you receive a message on the SNS Topic!
In a more realistic world, you would specify a filter policy to match messages on the SNS topic that you WANT your lambda to react to. You can read more about the subscription resource here.
Reacting to messages in a SQS Queue
There's also the possibility to have a lambda pull from an SQS Queue, this is how such an event source would look like when done in Terraform.
Just like with the SNS Topic, we can use an existing one, or create our own queue.
data "aws_sqs_queue" "lambda-queue" {
  name = "lambda-queue"
}

...

resource "aws_sqs_queue" "lambda-queue" {
  name = "lambda-queue"
}
And now, we can use the SQS queue as an event source for the lambda function.
resource "aws_lambda_event_source_mapping" "lambda" {
  event_source_arn = aws_sqs_queue.lambda-queue.arn
  function_name    = aws_lambda_function.lambda.arn
  batch_size = 10
  maximum_batching_window_in_seconds = 0
}
Please note two important settings for the event subscription: batch_size and maximum_batching_window_in_seconds. Batch size is how many records you want to receive in your lambda event.Records attribute and maximum batching window is the time in seconds from 0 to 300 how long the internal SQS ingestion framework waits until it sends the batch of records (up to your batch size) to your lambda. Setting this to 0 effectively disables the wait time, and it will send the queue messages as they come in. You can read more about this here.
One final adjustment is needed, because now we have to allow our lambda role to receive messages from SQS. Move up to the lambda role policy and adjust it as follows:
resource "aws_iam_role_policy" "lambda" {
  name = "lambda-permissions"
  role = aws_iam_role.lambda_role.name
  policy = jsonencode({
    Version = "2012-10-17"
    Statement = [
      {
        Action = [
          "logs:CreateLogGroup",
          "logs:CreateLogStream",
          "logs:PutLogEvents",
        ]
        Effect   = "Allow"
        Resource = "*"
      },
      {
        Action = [
          "sqs:ReceiveMessage",
          "sqs:DeleteMessage",
          "sqs:GetQueueAttributes"
        ]
        Effect   = "Allow"
        Resource = aws_sqs_queue.lambda-queue.arn
      },
    ]
  })
}
Note here, that we are referencing our SQS queue resource. If you used a data resource instead, don't forget to prefix the reference with data.
And now you should be good to go with your SQS event source.
Conclusion
We are at the end of the article. Before you leave, don't forget to delete the resources you have provisioned with Terraform because they might incur costs, and we don't want that.
To do this, issue the terraform destroy command in your directory and confirm it. Your role, lambda function, and eventual event sources will be deleted. This is possible thanks to the state file that is residing in your directory.
Please note, that this will only delete resources you have actually created. All data.* entries are merely lookups and won't be touched.
Improvements
There are many more features to explore with Terraform. Let's explore one of the most important ones.
Version control for Terraform Configurations
When multiple engineers work on terraform configuration it is advised to have the state file in a common storage like s3 and implement some sort of locking mechanism so that there aren't multiple terraform apply's on the same state file. Because that would surely cause mayhem or corruption in the terraform state.
While there are tools and ways to repair a broken state file, this is beyond the scope of this tutorial and I don't recommend it.
Let's move back to our code directory and create a new file called backend.tf
In there, you can specify an s3 bucket and a dynamo db table to be used for your state file.
terraform {
  backend "s3" {
    bucket = "my-terraform-state-bucket"
    key    = "terraform.tfstate"
    region = "eu-central-1"
    dynamodb_table = "locking-table"
  }
}
Please note that these resources (s3 bucket and dynamodb table) have to be present before you run the command.
When your backend is present, you have to run terraform init again, which will configure your local environment to use the s3 backend from now on.
Now you can safely apply, destroy, and collaborate with your colleagues over your new infrastructure code.
Wrap Up
In this comprehensive guide, we explored the benefits of using Terraform with AWS Lambda, covering the basics of AWS Lambda and Terraform, along with setting up prerequisites.
We demonstrated how to create and deploy a Lambda function using Terraform, configure it further, and add various event sources. Finally, we discussed improvements, such as version control for Terraform configurations, to enhance your infrastructure management experience.
Are you interested in more?
Head over to our bi-weekly newsletter or check out the following blog posts
What Is Terraform? A Beginner's Guide to the Most Famous Infrastructure-as-Code Tool
Best Practices to Avoid and Troubleshoot Timeouts in AWS Lambda
AWS Lambda Pricing: A Complete Guide to Understanding the Cost of the Serverless Service
Frequently Asked Questions
What are the benefits of using Terraform with AWS Lambda?
Using Terraform with AWS Lambda allows you to manage your infrastructure as code, co-locate your infrastructure code with your application code, and deploy and update Lambda functions without navigating the AWS Console.
What is the difference between a resource and data in Terraform?
Resources in Terraform represent AWS resources that will be created in your AWS account, while data is used for lookups of existing data or resources that you want to reference in your resources.
How can I expose my AWS Lambda function through different event sources?
You can expose your AWS Lambda function through various event sources such as API Gateway, SQS, and SNS by configuring the appropriate resources and triggers in your Terraform configuration.
How do I store my Terraform state file in a shared storage like S3?
Create a
backend.tffile and specify an S3 bucket and a DynamoDB table for your state file. This allows multiple engineers to work on the same Terraform configuration while avoiding conflicts.How do I destroy the resources created by Terraform?
To destroy your resources, run the
terraform destroycommand in your directory and confirm the action. This will delete your resources based on the information in the Terraform state file.