


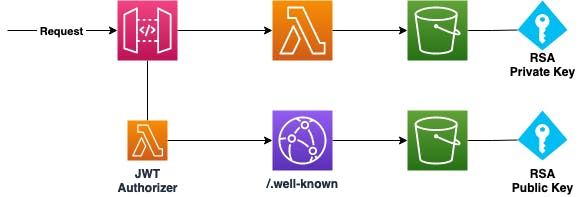
Securing your Serverless Application with self-signed JWTs & AWS HTTP Gateway


There are a lot of products offering you an all-in-one managed authentication & authorization solution, like Auth0.
But what if you want to manage everything on your own and don’t rely on third parties? It’s not as complicated as you think to issue your own self-signed JSON Web Tokens (JWTs) and use them with AWS’ API Gateway to protect your Serverless application.
The solution is highly customizable, meaning you can carry whatever data you like inside your token and you’re in control of everything. Also, you’re taking advantage of AWS’ HTTP API Gateway instead of REST, which brings a few advantages:
it’s way cheaper. You’re only paying $1 per 1m requests, instead of $3.5 (example based on us-west-1), which is ~71% less.
you can use the default JWT Authorizer, which only requires minimum configuration efforts. There’s no need for your own Authorizer Lambda function.
A short wrap-up on what we’ll do:
Define and provide our OpenID Connect well-known endpoint
Create an RSA key pair
Configure a JWT Authorizer for token validation & route protection
Create the code for issuing our self-signed tokens
For adding infrastructure, we’re using Terraform and Serverless Framework. Looking at our necessary steps, we’ll take care of providing our OpenID Connect endpoint via CloudFront and S3, defined via Terraform, and everything else via Serverless Framework.
Defining all needed variables
The create our OpenID configuration, configure our Authorizer and create our extend our function to issue tokens, we need some variables which are both available at our Terraform module, as well as our Serverless YAML file.
So let’s start by going through them.
Issuer Domain— our own domain which will later serve our OpenID configuration.
Key Identifier — the identifier for our RSA key pair which is used to issue & validate tokens.
Audience — the audience for which we issue our tokens.
To keep everything in a single place, we’ll define those in our Terraform module inside locals.tf.
locals {
  issuer      = "openid.myexampledomain.test"
  key\_id      = "my-key-id"
  audience    = "my-audience"
}
Afterward, we can directly export those to the Parameter Store, so that we can later use them in our serverless.yml file.
# repeat this for our key identifier as well as our audience
resource "aws\_ssm\_parameter" "issuer" {
  type        = "String"
  name        = "issuer"
  value       = local.issuer
  overwrite   = *true
}
Now we can get into the exciting parts.
Creating your .well-known Endpoint
The first thing we need to do is to provide an endpoint where our Authorizer, which we’ll create in a later stage, can retrieve its necessary details for the token validation. The starting point for this is the OpenID Configuration at ./well-known/openid-configuration, which has to return a JSON response with at least the two attributes jwks_url and issuer.
issuer — the URI of the Identity provider which issues our tokens. We defined this by providing the (sub-)domain we want to use.
jwks_url — the URL which can be used to retrieve the necessary details to verify the signature of the tokens, for example, the identifier of the key, the used algorithm, or the used public key.
We want to have two separate S3 buckets. The first one will be used to store both the public and private parts of our RSA key, which generation we’ll take care of in a later step. The second bucket is for providing our configuration JSON files that will be needed for the Authorizer. To avoid leaking our files, we’ll completely restrict any access to the internet in the first place. In my example, I’m using private as an example name for the bucket holding our RSA key pair & public as the bucket holding our well-known configuration, which will later be accessible via CloudFront.
resource "aws_s3_bucket" "buckets" {
  for_each = toset(["private", "public"])
  bucket   = each.value
  acl      = "private"
  server_side_encryption_configuration {
    rule {
      apply_server_side_encryption_by_default {
        sse_algorithm = "AES256"
      }
    }
  }
}
resource "aws_s3_bucket_public_access_block" "public_access_block" {
  for_each                = aws_s3_bucket.buckets
  bucket                  = each.value.id
  block_public_acls       = true
  block_public_policy     = true
  ignore_public_acls      = true
  restrict_public_buckets = true
}
Now we’ve got to add the CloudFront distribution. You don’t need to use CloudFront, you can also just serve our configuration files directly via S3. In this case, just skip the following part and enable the public hosting option for the S3 bucket.
resource "aws_cloudfront_origin_access_identity" "main" {
  comment = "OIDC Bucket Access Identity"
}

resource "aws_cloudfront_distribution" "dist" {
  enabled      = true
  http_version = "http2"

  viewer_certificate {
    acm_certificate_arn      = aws_acm_certificate.main.arn
    ssl_support_method       = "sni-only"
    minimum_protocol_version = "TLSv1.2_2019"
  }

  aliases = ["local.issuer"]

  origin {
    origin_id   = "origin-bucket-${aws_s3_bucket.main.id}"
    domain_name = aws_s3_bucket.buckets["public"].bucket_regional_domain_name

    s3_origin_config {
      origin_access_identity = aws_cloudfront_origin_access_identity.main.cloudfront_access_identity_path
    }
  }

  default_root_object = "index.html"

  custom_error_response {
    error_code            = "404"
    error_caching_min_ttl = "0"
    response_code         = "200"
    response_page_path    = "/index.html"
  }

  default_cache_behavior {
    allowed_methods = ["GET", "HEAD", "OPTIONS"]
    cached_methods = ["GET", "HEAD", "OPTIONS"]
    forwarded_values {
      query_string = "true"
      cookies { forward = "none" }
    }
    target_origin_id = "origin-${aws_s3_bucket.buckets["public"].id}"
    viewer_protocol_policy = "redirect-to-https"
    compress               = true
  }
  restrictions {
    geo_restriction { restriction_type = "none" }
  }
}
data "aws_acm_certificate" "main" {
  domain   = replace(data.aws_route53_zone.main.name, "/[.]$/", "")
  provider = aws.us-east-1
}
data "aws_route53_zone" "main" {
  name = "$YOUR_HOSTED_ZONE"
}

resource "aws_route53_record" "main" {
  zone_id = data.aws_route53_zone.main.zone_id
  name    = var.domain
  type    = "A"

  alias {
    name                   = aws_cloudfront_distribution.dist.domain_name
    zone_id                = aws_cloudfront_distribution.dist.hosted_zone_id
    evaluate_target_health = true
  }
}
Have a closer look at the $YOUR_HOSTED_ZONE, as you need to provide your hosted zone here. You can also skip this part and just use the domain which will be automatically generated by CloudFront (<someId>.cloudfront.net). In this case, make sure to export this URL to the Parameter Store instead of our predefined issuer variable.
As the last part of this step, we need to authorize CloudFront to access our public bucket.
data "aws_iam_policy_document" "main" {
  statement {
    sid    = "CloudFrontAccess"
    effect = "Allow"

    actions = [
      "s3:GetObject",
      "s3:List*",
    ]

    resources = [
      aws_s3_bucket.buckets["oidc"].arn,
      "${aws_s3_bucket.["oidc"].arn}/*"
    ]

    principals {
      identifiers = [aws_cloudfront_origin_access_identity.main.iam_arn]
      type        = "AWS"
    }
  }
}
As we can serve files via CloudFront now, we can generate and add our well-known files next.
Generate & provision our Configuration
At first, we’ll create the subfolder .well-known in our Terraform module. In this folder, we’ll first add the JSON file we’re serving ./well-known/openid-configuration with the name openid-configuration.json.
{
  "issuer": "$ISSUER",
  "jwks\_uri": "$ISSUER/.well-known/jwks.json"
}
The other file is jwks.json and will contain all details which are required to validate the signature of our JWTs:
{
  "keys": [{
    "alg": "RS256",
    "kty": "RSA",
    "use": "sig",
    "kid": "$KEY_ID",
    "x5c": ["$PUBLIC_KEY"]
  }]
}
Both files are containing placeholders, prefixed with $, which you’ve seen before.
ISSUER — that’s our domain that serves the OpenID configuration endpoint. We’ll replace this with our
local.issuer.KEY_ID— that’s our defined key identifier. As our JWKS could probably contain multiple keys to allow key rotation, this tells the client which key to use for the signature validation. As in our case, we’re only adding a single key for now, you can just put in a random string you like. We can replace this with
local.key_id.PUBLIC_KEY — this is the public part of the RSA key we’ll generate in the next step, so we can substitute this also.
Let’s do the actual key generation via OpenSSL:
# creating the key
openssl genrsa -out "private.key" 4096
# extracting the public part
openssl rsa -in "private.key" -outform PEM -pubout -out "public.key"
Now, we can upload both parts to our private configuration bucket (the one which is not accessible via CloudFront), to persist them centrally. You can either do this via the AWS Console or via the AWS CLI with aws s3 cp ./*.key s3://$BUCKET_NAME/ --recursive if you’re in the folder where we created the keys. The bucket name in our case would be private but will be different in your setup.
Now we can take care of substituting the variables in our configuration files and uploading them to our destination bucket:
locals {
  s3_domain = aws_s3_bucket.buckets["public"].bucket_domain_name
  key_s3_url = "s3://${local.s3_domain}/public.key"
  openid_config_path = "${path.module}/.well-known/openid-configuration.json"
  jwks_path = "${path.module}/.well-known/jwks.json"
  key_public_path = "${path.module}/.well-known/public.key"
}
resource "aws_s3_bucket_object" "openid-configuration" {
  bucket       = aws_s3_bucket.buckets["public"].bucket
  key          = ".well-known/openid-configuration"
  content_type = "application/json"
  content      = replace(file(local.openid_config_path), "$ISSUER", local.issuer)
  etag         = filemd5(local.openid_config_path)
}

resource "aws_s3_bucket_object" "jwks" {
  provisioner "local-exec" {
    command = "aws s3 cp ${locals.key_s3_url} ${path.module}/.well-known"
  }
  bucket       = aws_s3_bucket.buckets["public"].bucket
  key          = ".well-known/jwks.json"
  content_type = "application/json"
  content = replace(replace(replace(replace(replace(replace(file(local.jwks_path)
  ,"$KEY_ID", local.key_id)
  ,"$PUBLIC_KEY", file(local.key_public_path))
  ,"-----BEGIN PUBLIC KEY-----", "")
  ,"-----END PUBLIC KEY-----", "")
  ,"/\\s/", "")
  ,"/\r?\n|\r/", "")
  etag = filemd5(local.jwks_path)
}
The local-exec is used to retrieve our public key which is needed in our jwks.json file. This is needed so that we can apply our Terraform everywhere and not just one the machine at which we created our keys.
With Terraform’s replace, we’ll take care of replacing all of our variables in our JSON files. Also, we’ll make sure that our public key is in the right format, by removing the prefix and suffix, as well as possible line breaks and spaces.
Surely, this setup can be improved in a lot of ways. As a first step, it would be useful if we can easily generate a new key that will be added automatically, so we can rotate the keys without invalidating tokens that are signed with older keys.
Short wrap-up on what we’ve got now:
our issuer URI (
https://openid.myexampledomain.test) which serves the well-known endpoint at/.well-known/openid-configurationour JWKS endpoint at
./well-known/jwks.jsonwhich contains our public key informationour used key identifier:
my-key-idour audience:
my-audience
Now we can integrate this with our API Gateway and our Serverless application.
Adding the JWT Authorizer Configuration
Let’s define our Authorizer by retrieving our exported variables from the Parameter Store via ssm.
provider:
  httpApi:
    authorizers:
      jwtAuthorizer:
        identitySource: $request.header.Authorization
        issuerUrl: https://${ssm:issuer}
        audience:
          - ${ssm:audience}
That’s mostly all we need to do. Now we can attach it to our Lambda functions via new protected routes. Also, we’ll directly pass the variables needed to issue valid tokens.
functions:
  my_lambda:
    # here's your other configuration!
    environment:
      KEY_ID: ${ssm:key_id}
      AUDIENCE: ${ssm:audience}
      ISSUER: https://${ssm:issuer}
    events:
      - httpApi:
          path: /myfunction/protected/user/{proxy+}
          method: GET
          authorizer:
           name: jwtAuthorizer
           scopes:
             - USER
      - httpApi:
          path: /myfunction/protected/admin/{proxy+}
          method: GET
          authorizer:
           name: jwtAuthorizer
           scopes:
             - ADMIN
As the example shows, you can also define scopes to have fine-grained access control. In this example, we’ll allow access to certain proxy paths only for specific scopes.
Issuing self-signed Tokens
Let’s get to the actual token generation. To sign our tokens, we need the private key we generated in one of our earlier steps. You need to package this key inside the zip file which contains your Lambda function, so it’s accessible at runtime. In my example, I’m providing the key file at the root level with the name private.key.
Now to the actual coding part. All we really need is the [jsonwebtoken](https://www.npmjs.com/package/jsonwebtoken) package to immediately start issuing your own tokens, also including the scopes we want to put inside (or other arbitrary data!).
import * as jwt from 'jsonwebtoken'
import * as fs from 'fs'
async issueToken(): Promise<string> {
    const privateKey = fs.readFileSync('./dist/private.key').toString('utf8')
    const cfg: any = {
        algorithm: 'RS256',
        audience: process.env.AUDIENCE,
        issuer: process.env.ISSUER,
        keyid: process.env.KEY_ID,
    }
    const payload: any {
        scope: 'USER ADMIN'
    }
    return new Promise((resolve, reject) => {
        jwt.sign(jwt, privateKey, cfg, (err: any, token: any) => {
            if (err) {
                console.log(err)
                return reject()
            }
            console.log(`Token successfully issued`)
            resolve(token as string)
        })
    })
}
I’ve used USER and ADMIN as the default scopes for this example, but you should make this actually useful for you.
That’s it. We’ve put all the pieces together.
If something’s not working out as expected, a good way to validate your self-signed tokens or debug your implementation on the fly is jwt.io. Just paste in your token to see the header, payload, and signature details. You can also provide the public key to validate the signature. In addition, the site offers a lot of good explanations about JWTs & the concept behind them.