


Mastering the AWS Lambda CLI - A Guide for Deployment, Management, and More


At AWS, everything is an API. Even if you're using the console interface, the browser only translates your clicks to calls to the AWS API.
That's why you can easily automate everything around Lambda from your local terminal. This includes the creation of a function, attaching necessary permissions via an execution role, packaging and deploying, as well as monitoring and debugging. There's no reason to leave your terminal at all.
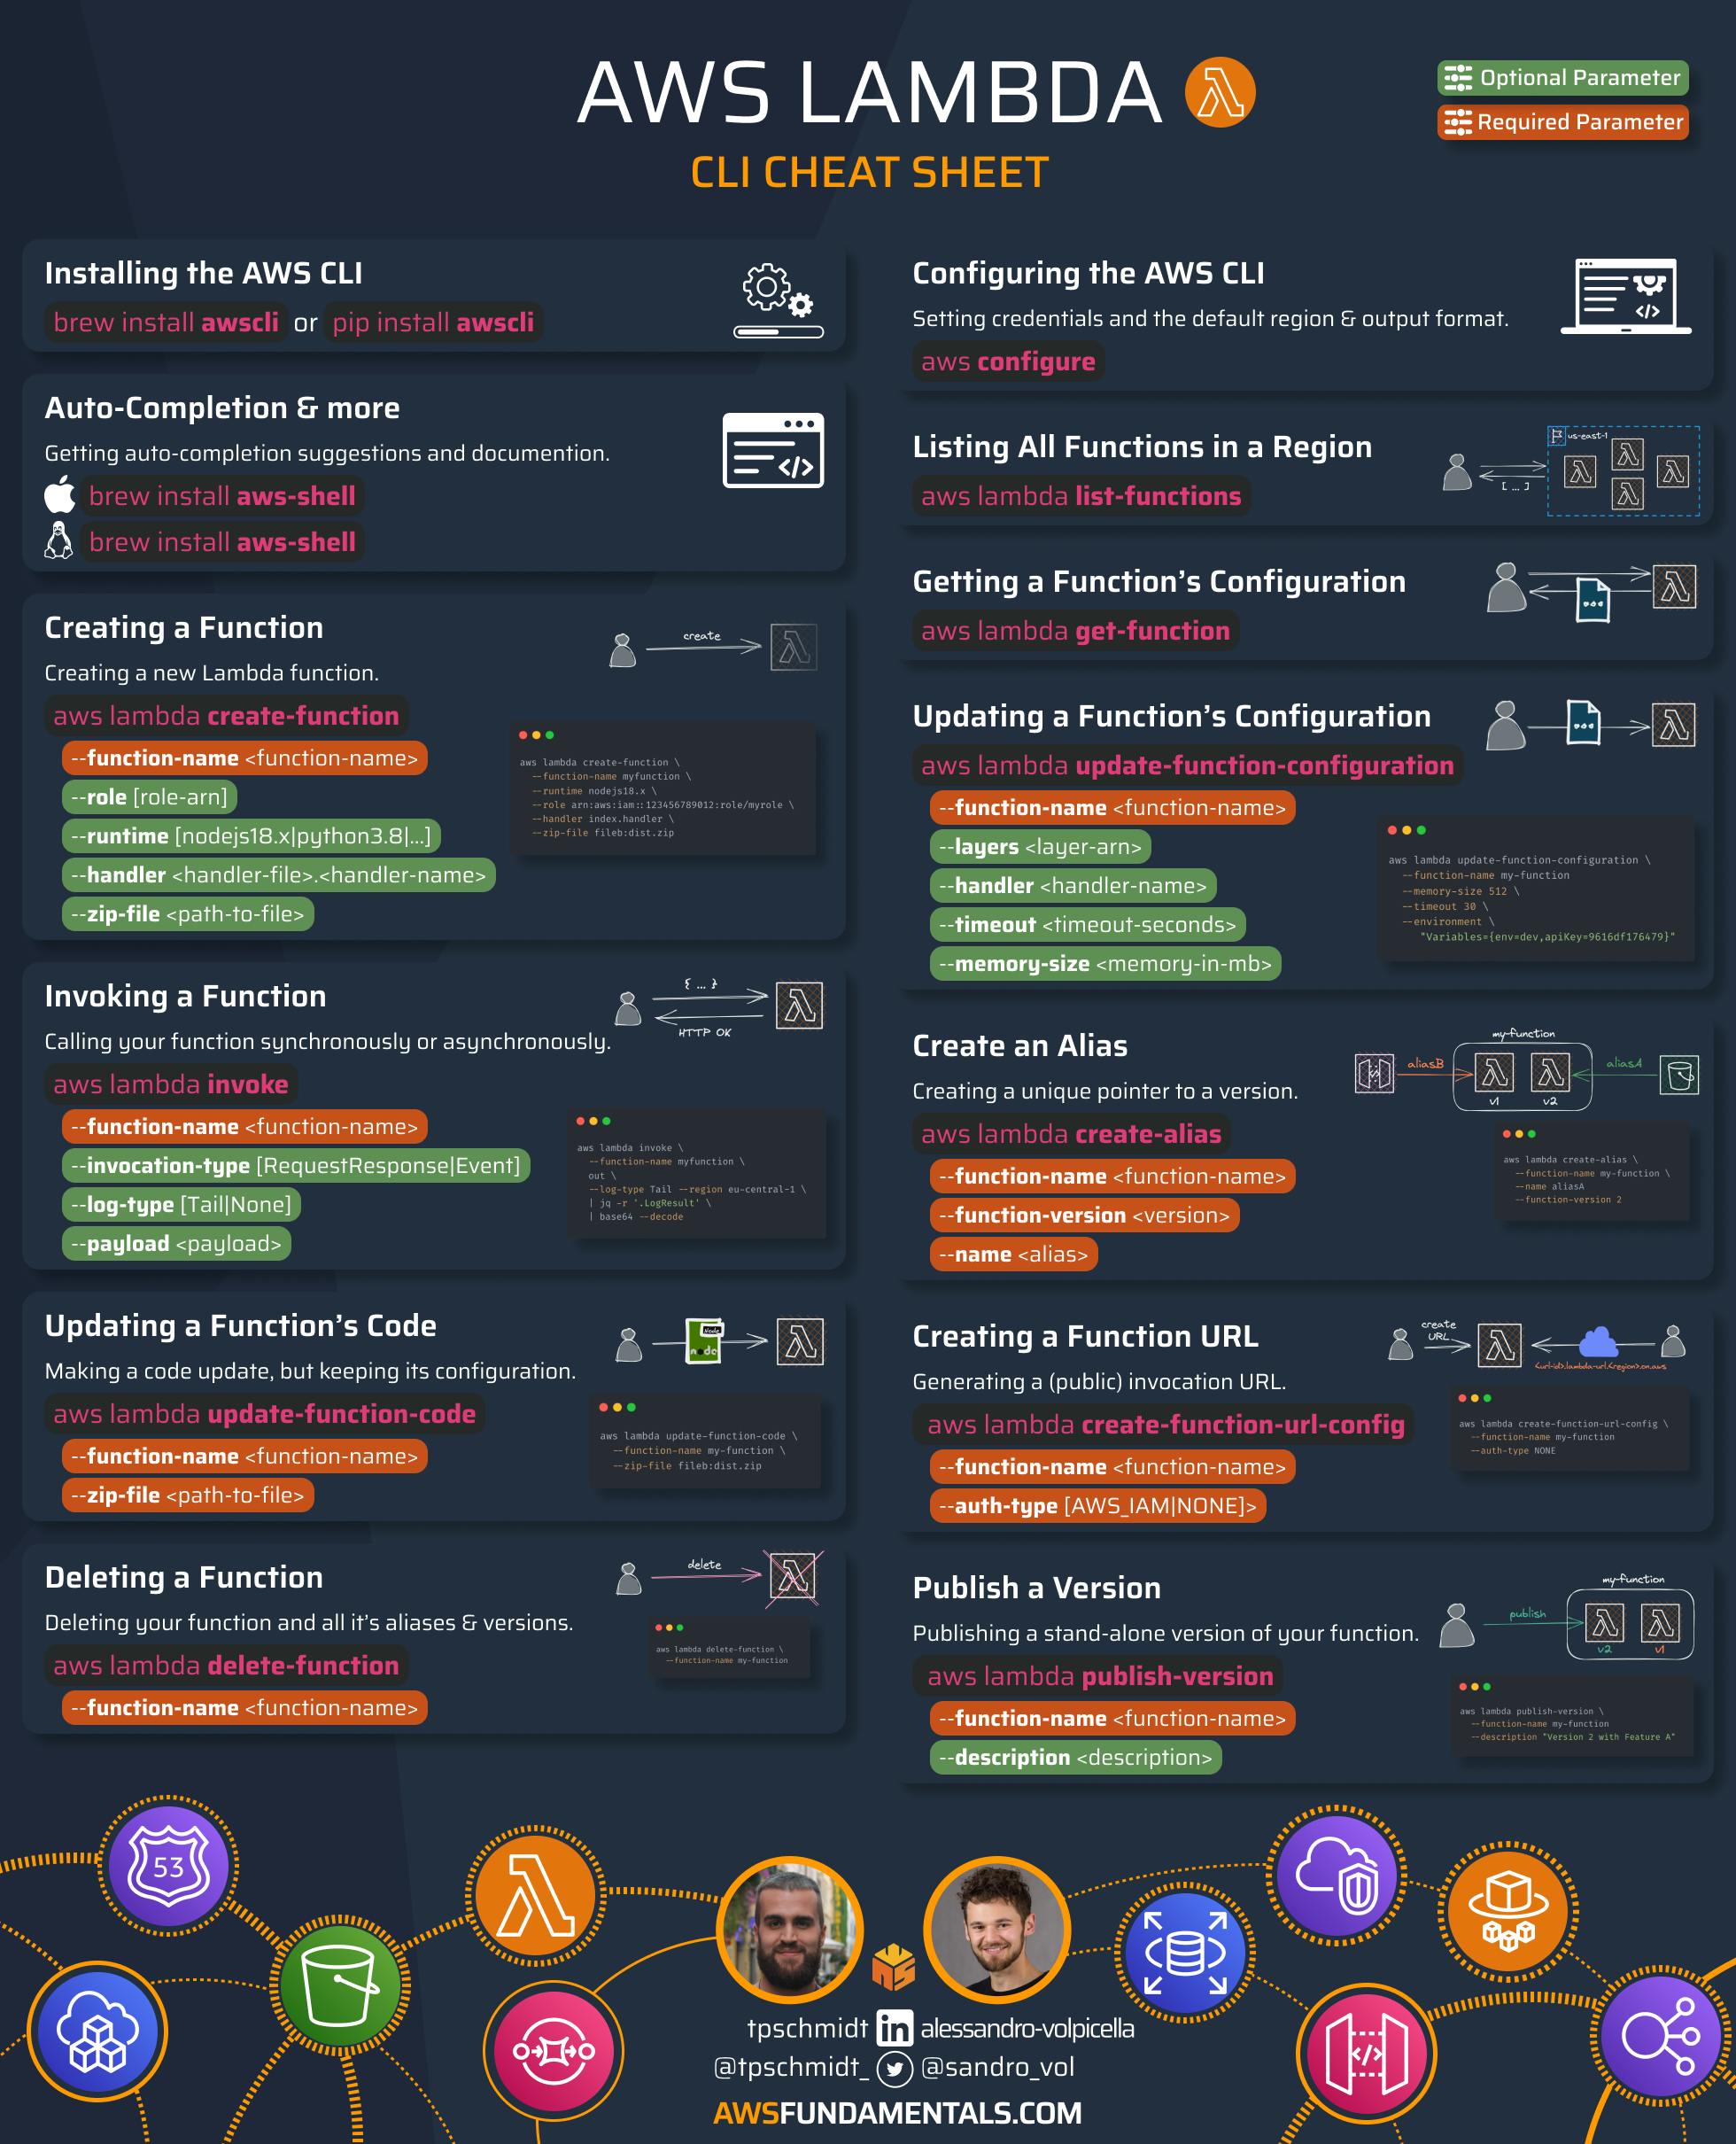
AWS Lambda CLI Infographics
If you're eager to dive right in and have already set up your terminal, you can also explore the most essential AWS Lambda CLI commands.
Getting Started
Before we can jump into the action, we need to have the AWS CLI installed locally. We also have to configure our credentials.
If you're already ready to go, you can safely skip this part.
Installing the AWS CLI
We'll now install the AWS CLI. When using macOS, you can use homebrew via brew install awscli to get the latest version. For Linux and Windows, there's a similar process.
Configuration of our Credentials
You need to be authenticated and authorized to access your account via the AWS CLI. This requires you to have an Access Key ID and Secret Access Key. Let's head over to your user's security credentials settings so we can create a pair of those if you haven't done this already.
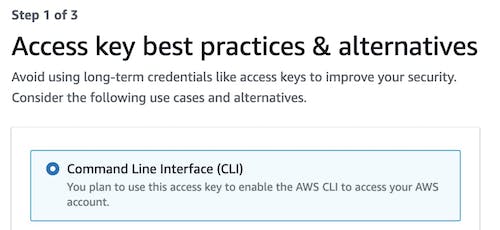
We'll select the Command Line Interface (CLI). The AWS console may note that it's recommended to make use of the IAM Identity Center to access the AWS CLI.
Make sure to save your Secret Access Key, as you can't display it again.
Now we can jump back into our terminal and run aws configure which will prompt us for our previously created Access Key and Secret Access Key. It will also ask for a default region, e.g. us-east-1, and the default output format, e.g. json.
If you've set up everything properly, you should be able to get a few details of your account and user by running aws sts get-caller-identity.
AWS-Shell for Auto-Completions
The AWS-CLI is great, but it's often also not very intuitive as it's packed with a lot of commands. Wouldn't it be great to have auto-completion and a lot more documentation right in the terminal?
That's exactly what aws-shell does. And it makes life in the terminal much easier.
Common Use Cases for the AWS Lambda CLI
There's a lot you can do with the AWS Lambda CLI, but let's focus on the most important parts:
Setting up an Execution Role - constructing an execution role with necessary permissions so we're able to invoke our function.
Packaging our Function's Code - packaging our code into a ZIP archive so we can upload it to AWS.
Creating a new Function - building a new function and creating it in AWS.
Invoking our Function - triggering the execution of our function.
Deploying Updated Code - updating our code and deploying an update to our function without touching any other configuration.
Monitoring our Executions - monitoring the execution of your function via browsing through its CloudWatch logs.
Setting up a New Execution Role
Each Lambda function needs an attached role at AWS Identity and Access Management (IAM).
This role is automatically assumed by the function when its executed.
It determines its permissions.
A role can be used by multiple functions, but generally, it's good practice to use a dedicated role per function so you can only assign permissions that are needed.
Let's jump into the terminal and create a new directory so we have everything for a new function in one place. Then we'll add our first file that will contain our role's permissions.
mkdir myfunction && cd myfunction
touch policy.json
Open the policy.json in your favorite editor or IDE (e.g. VSCode, which is free), and insert the following:
{
  "Version": "2012-10-17",
  "Statement": [
    {
      "Effect": "Allow",
      "Principal": {
        "Service": "lambda.amazonaws.com"
      },
      "Action": "sts:AssumeRole"
    }
  ]
}
The policy only grants the single permission sts:AssumeRole to the principal of the AWS service. This is necessary that the function can use this role when it's executed.
This policy can be extended with any permission the function later needs, e.g. dynamodb:Query for a DynamoDB table or index.
Let's submit the new role via the AWS CLI.
aws iam create-role \
    --role-name myfunction-exec \
    --assume-role-policy-document \
    file://policy.json
If the command succeeds, the response will include your new role's ARN, which we'll need later on.
arn:aws:iam::<ACCOUNT_ID>:role/myfunction-exec
Packaging our Function's Code into a Deployment Unit
Let's create a minimal Node.js function handler next by creating a new file index.js. It will only return the function's name and the memory configuration via the predefined environment variables.
exports.handler = async (event, context) => {
    const name = process.env.AWS_LAMBDA_FUNCTION_NAME;
    const memory = process.env.AWS_LAMBDA_FUNCTION_MEMORY_SIZE;
    console.log(`Function '${name}' has '${memory}' MB of memory.`);
    return { name, memory };
}
Let's package our function into a ZIP file via zip myfunction.zip handler.js.
Creating a Function
We now already have everything we need to create the function at AWS. So let's do that by using the Lambda CLI for the first time via aws lambda create-function.
aws lambda create-function \
    --function-name myfunction \
    --handler index.handler \
    --runtime nodejs18.x \
    --role arn:aws:iam::<ACCOUNT_ID>:role/myfunction-exec \
    --zip-file fileb://myfunction.zip
Let's quickly go through our passed parameters:
| Parameter Name | Description |
| --function-name | The name will be shown in the AWS console interface. This name has to be unique per region. |
| --handler | The file and method name of our handler. In our case, the method handler resides in our index file. |
| --runtime | The runtime. We're using the latest Node.js version. |
| --role | Our execution role's ARN we received before. |
| --zip-file | The full path to our deployment unit. |
You'll receive a large response that contains a lot of details about our created function. Let's quickly check via the aws lambda list-functions command that our function exists.
Let's also make use of the query parameter that allows us to filter the fields that will be returned in the response. To enhance the readability, we'll also print it on a pretty table.
aws lambda list-functions \
    --query 'Functions[].{Name:FunctionName,Memory:MemorySize,Timeout:Timeout}' \
    --output table

--------------------------------------------------------------
|                        ListFunctions                       |
+---------+--------------------------------------+-----------+
|  Memory |                Name                  |  Timeout  |
+---------+--------------------------------------+-----------+
|  128    |  myfunction                          |  3        |
+---------+--------------------------------------+-----------+
As we didn't pass the memory and timeout configuration, we've received the defaults: 128 MB memory with a timeout of 3 seconds.
Invoking our Functions
Now that we've created our function, let's see if we can invoke it via the CLI.
aws lambda invoke --function-name myfunction out --log-type Tail

{
    "StatusCode": 200,
    "LogResult": "U1RBUlQgUmVxdWVzdElkOiA0YzQ5MDQyYy0yNTY3LTQ4OWYtYTcyMS04MDkwYTVjY2QxZWIgVmVyc2lvbjogJExBVEVTVAoyMDIzLTAyLTA3VDA3OjMyOjA5Ljg4OFoJNGM0OTA0MmMtMjU2Ny00ODlmLWE3MjEtODA5MGE1Y2NkMWViCUlORk8JRnVuY3Rpb24gJ215ZnVuY3Rpb24nIGhhcyAnMTI4JyBNQiBvZiBtZW1vcnkuCkVORCBSZXF1ZXN0SWQ6IDRjNDkwNDJjLTI1NjctNDg5Zi1hNzIxLTgwOTBhNWNjZDFlYgpSRVBPUlQgUmVxdWVzdElkOiA0YzQ5MDQyYy0yNTY3LTQ4OWYtYTcyMS04MDkwYTVjY2QxZWIJRHVyYXRpb246IDEuNDEgbXMJQmlsbGVkIER1cmF0aW9uOiAyIG1zCU1lbW9yeSBTaXplOiAxMjggTUIJTWF4IE1lbW9yeSBVc2VkOiA2NSBNQgkK",
    "ExecutedVersion": "$LATEST"
}
The log results are Base64 encoded, but we can decode them on-the-fly via jq.
aws lambda invoke \
    --function-name myfunction \
    out --log-type Tail \
    | jq -r '.LogResult' \
    | base64 --decode

START RequestId: 4147dd22-786a-480c-8a11-117d75bb3b84 Version: $LATEST
2023-02-07T07:36:01.551Z    4147dd22-786a-480c-8a11-117d75bb3b84    INFO    Function 'myfunction' has '128' MB of memory.
END RequestId: 4147dd22-786a-480c-8a11-117d75bb3b84
REPORT RequestId: 4147dd22-786a-480c-8a11-117d75bb3b84    Duration: 1.35 ms    Billed Duration: 2 ms    Memory Size: 128 MB    Max Memory Used: 66 MB
There we go. Let's try another example.
By default, our function will be invoked synchronously, but we can also invoke them asynchronously by passing the invocation type Event.
aws lambda invoke \
    --function-name myfunction \
    --invocation-type Event \
    out --log-type Tail

{
    "StatusCode": 202
}
The invocation now doesn't wait for the function to finish its execution but returns immediately. We only see the status code ACCEPTED (HTTP 202) and no logs.
Deploying Code Updates
Let's adapt our function so it also prints the log group name to which it sends the console.log outputs.
exports.handler = async (event, context) => {
    const name = process.env.AWS_LAMBDA_FUNCTION_NAME;
    const memory = process.env.AWS_LAMBDA_FUNCTION_MEMORY_SIZE;
    const logGroup = process.env.AWS_LAMBDA_LOG_GROUP_NAME;
    console.log(`Function '${name}' has '${memory}' MB of memory and logs to '${logGroup}'`);
    return { name, memory };
}
Let's repackage our function and deploy it via update-function-code.
rm -f myfunction.zip && zip myfunction.zip index.js
aws lambda update-function-code \
    --function-name myfunction \
    --zip-file fileb://myfunction.zip
It only takes a few milliseconds and the function update is already live! Let's invoke it again via the command we've used before.
aws lambda invoke \
    --function-name myfunction \
    out --log-type Tail \
    | jq -r '.LogResult' \
    | base64 --decode

START RequestId: 5edc1a24-1886-4f3b-b33f-365ab4196636 Version: $LATEST
2023-02-07T07:47:37.361Z    5edc1a24-1886-4f3b-b33f-365ab4196636    INFO    Function 'myfunction' has '128' MB of memory and logs to '/aws/lambda/myfunction'
END RequestId: 5edc1a24-1886-4f3b-b33f-365ab4196636
REPORT RequestId: 5edc1a24-1886-4f3b-b33f-365ab4196636    Duration: 3.71 ms    Billed Duration: 4 ms    Memory Size: 128 MB    Max Memory Used: 64 MB    Init Duration: 215.87 ms
Monitoring our Executions via CloudWatch
We can now invoke our function and see its corresponding logs in the result. But what about invocations from other places? It would be nice to access the logs at any time.
We can also access the CloudWatch logs via our terminal via CloudWatch Logs for Humans. It's simple to install either via pip (pip install awslogs) or Homebrew (brew install awslogs). We also wrote an extensive guide on how to get the most out of this great tool.
Let's stick to the basics and only start a log stream. Let's list our log groups to see if we can find ours.
awslogs groups --aws-region us-east-1
Well, there's nothing. Why didn't our logs end up in CloudWatch?
Because our execution role doesn't include the necessary CloudWatch permissions.
But we can easily fix this by attaching the AWS-managed AWSLambdaBasicExecutionRole policy to our role via:
aws iam attach-role-policy \
    --role-name myfunction-exec \
    --policy-arn arn:aws:iam::aws:policy/service-role/AWSLambdaBasicExecutionRole
Let's invoke our function another time and then see if our log group exists afterward.
aws lambda invoke \
    --function-name myfunction \
    out --log-type None

awslogs groups --aws-region us-east-1

/aws/lambda/myfunction
There it is! Let's watch our log stream:
awslogs get /aws/lambda/myfunction --watch --aws-region us-east-1

As we've used --watch the log stream will stay open. Every output from the following invocations will be streamed to your terminal.
Updating our Function's Configuration
Lastly, let's adapt our function's configuration. Maybe we want to have more memory and a longer timeout.
aws lambda update-function-configuration \
    --function-name myfunction \
    --timeout 30 \
    --memory-size 2048

aws lambda invoke \
    --function-name myfunction \
    out \
    --log-type Tail --region eu-central-1 \
    | jq -r '.LogResult' \
    | base64 --decode

START RequestId: 2bad958d-16ba-4220-973c-085697d8c433 Version: $LATEST
2023-02-07T08:15:20.246Z    2bad958d-16ba-4220-973c-085697d8c433    INFO    Function 'myfunction' has '2048' MB of memory and logs to '/aws/lambda/myfunction'
END RequestId: 2bad958d-16ba-4220-973c-085697d8c433
REPORT RequestId: 2bad958d-16ba-4220-973c-085697d8c433    Duration: 3.06 ms    Billed Duration: 4 ms    Memory Size: 2048 MB    Max Memory Used: 65 MB    Init Duration: 216.08 ms
We immediately see that the configuration was indeed updated.
Deleting a Function
Let's finish our journey with the Lambda CLI by cleaning up our function and execution role.
# deleting our function
aws lambda delete-function --function-name myfunction
# detaching the AWS-managed policy
aws iam detach-role-policy \
    --role-name myfunction-exec \
    --policy-arn arn:aws:iam::aws:policy/service-role/AWSLambdaBasicExecutionRole
# deleting our function's role
aws iam delete-role --role-name myfunction-exec
# deleting all of our logs
aws logs delete-log-group --log-group-name /aws/lambda/myfunction
That's it. We've gone through the full cycle and we've cleaned up our resources afterward.
Keeping Your CLI Up-To-Date
It's recommended to always keep your AWS CLI up to date. If you're using homebrew, this is very simple. You can simply run brew upgrade awscli and homebrew will take care of installing the latest version.
AWS is very careful about breaking changes, so, likely, updates won't cause any commands to vanish or change drastically.
Conclusion
The AWS CLI is powerful and it's extremely valuable for AWS Lambda.
We've learned how to create a function, create an executive role with necessary permissions, deploy the function's code to AWS, and how you can easily browse through logs to see what's going on when issues arise. Everything without ever leaving the terminal in the first place.