

Learn How to Automate Welcome Emails with Amazon SES, Lambda and DynamoDB Streams


Welcome E-Mails are a must for every SaaS or web application 💌
While third-party services such as Mailchimp, and postmarkapp are amazing products, they can get quite expensive. Let me show you how to send simple welcome e-mails to new users with native AWS Services.
The Architecture
The architecture consists of three services.
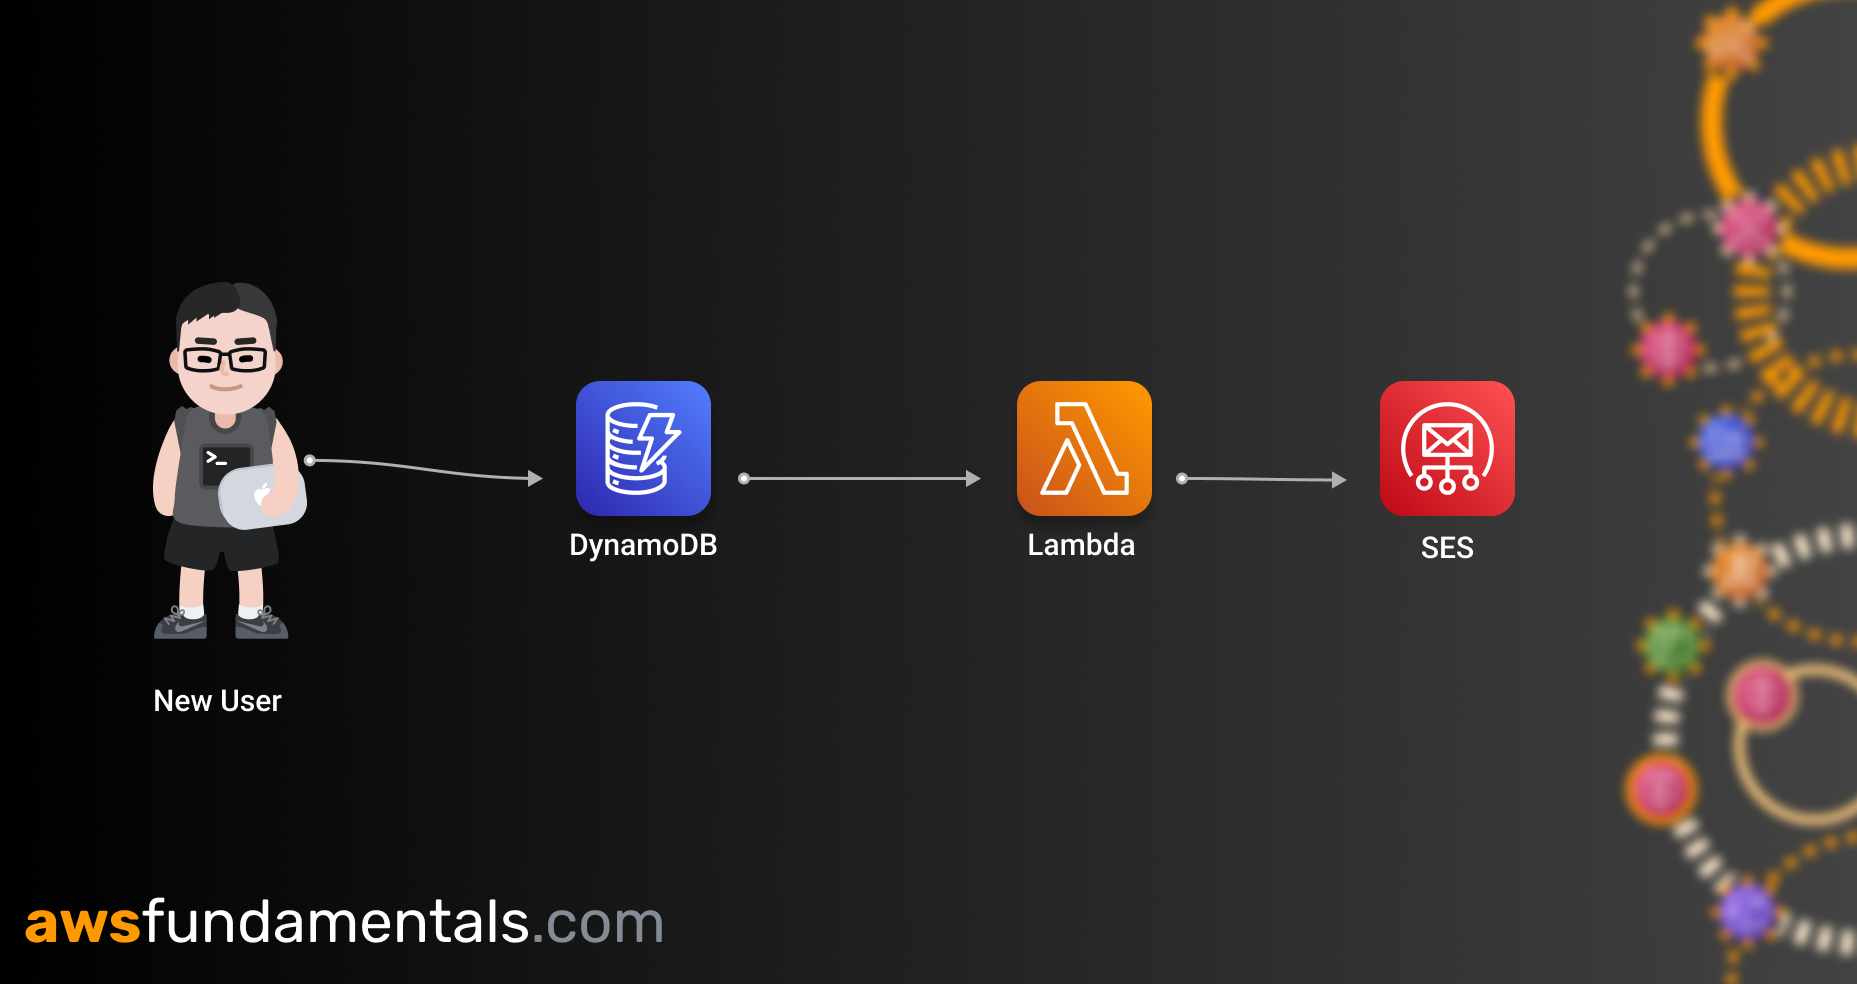
Amazon DynamoDB -> With DynamoDB Streams
AWS Lambda: Processing and sending of the mail
Amazon SES: The actual email sending
All infrastructure is handled in CDK and in the programming language TypeScript.
Services
Now let's have a look at some services in detail.
DynamoDB
We assume that new users are automatically added to DynamoDB. We don't cover authentication and user sign-ups in this post. However, it is often the case that after a user signs up with services such as Cognito or Auth0, the user will be added to a DynamoDB table.
For DynamoDB we have the amazing ability to add DynamoDB streams. DynamoDB streams allow us to stream data to AWS Lambda to further process this data. Since we want to send e-mails to new users we take the new user's email address and send the email to him.
  new aws_dynamodb.Table(this, "User", {
  partitionKey: {
    name: "id",
    type: aws_dynamodb.AttributeType.STRING,
  },
  stream: StreamViewType.NEW_IMAGE,
});
This CDK code creates a new table with the partition key id. By setting the stream to NEW_IMAGE we simply get the new item in our lambda function.
Lambda
The Lambda function receives an event like that. You can check the even in your CloudWatch Logs. This is the event for a DynamoDB Stream.
{
  "Records": [
    {
      "eventID": "d3f179c95bcced3a16ac56ca87d6e2c4",
      "eventName": "INSERT",
      "eventVersion": "1.1",
      "eventSource": "aws:dynamodb",
      "awsRegion": "us-east-1",
      "dynamodb": {
        "ApproximateCreationDateTime": 1660547022,
        "Keys": {
          "id": {
            "S": "auth0|123"
          }
        },
        "NewImage": {
          "createdAt": {
            "S": "2022-08-15T07:03:41.972Z"
          },
          "name": {
            "S": "sandro@volpee.com"
          },
          "id": {
            "S": "auth0|123"
          },
          "email": {
            "S": "sandro@volpee.com"
          },
          "username": {
            "S": "sandro@volpee.com"
          }
        },
        "SequenceNumber": "474281900000000035361156211",
        "SizeBytes": 372,
        "StreamViewType": "NEW_IMAGES"
      },
      "eventSourceARN": "arn:aws:dynamodb:us-east-1:123:table/Prod-slsq-TablesUserF42B2257-1EVY7MBMER83Y/stream/2022-05-07T15:07:57.763"
    }
  ]
}
In the section newImage you can see the new item that was added to the DynamoDB table.
For the actual welcome E-Mail, we use normal text and no HTML, at least for now. With SES you can also use templates and fill them with variables.
The Lambda function is doing the following tasks:
Map over all records (DynamoDB streams send the event with a
Recordsarray)Check if all data is available
Fill placeholders in the string
Send the actual email
Here is the code:
export async function main(event: DynamoDBStreamEvent) {
  return await Promise.all(
    event.Records.map(async (record) => {
      if (record.eventName !== 'INSERT') {
        return;
      }
      if (!record.dynamodb) {
        return;
      }

      if (!record.dynamodb.NewImage) {
        return;
      }

      const newUser = Converter.unmarshall(record.dynamodb.NewImage) as User;

      if (!newUser.email) {
        throw new Error('User has no email address');
      }

      const sesParams: SendEmailRequest = {
        Destination: {
          ToAddresses: [newUser.email]
        },
        Message: {
          Subject: {
            Data: 'Welcome to ServerlessQ 🚀'
          },
          Body: {
            Text: {
              Charset: 'UTF-8',
              Data: welcomeText
            }
          }
        },
        Source: 'Sandro from SLSq <sandro@serverlessq.com>'
      };


      return await ses.sendEmail(sesParams).promise();
    })
  );
}
Important Prerequisite
You need to have production access to SES to be able to send emails. Without that access, you can only send data to verified identities and not o everybody.
Check out this link on how to get production access on SES. And reserve some time because sometimes AWS takes some days to grant you access. Make also sure to handle bounces in SES since this can hurt your e-mail reputation a lot.
Final Notes
I hope that the article helped you set up your custom emails. There is of course much more possible with that stack. For example, you could send emails to your customers after specific actions happened or after a certain timeframe. Especially for reminder emails (e.g. after 7 days) step functions can be used very easily.
Have fun implementing your e-mails.
If you're interested in more make sure to check out awsfundamentals.com and sign up for our newsletter.
👋