

Creating a Custom Build Dashboard for CodePipeline
A single view dashboard that's customizable, powered by Lambda, S3, CloudFront, and API Gateway.


Table of contents
If you’re building something on AWS, there’s a good chance you’re also using AWS CodeBuild & CodePipeline. You only need to provide your build images, it just works and natively integrates with all other AWS services easily, which is quite neat.
But let’s be honest: the console interface is just frustrating. Being used to Jenkins or other similar tools, with CodePipeline there’s no overview of all your Pipeline steps and you need a lot of clicks for regular tasks like restarting builds.
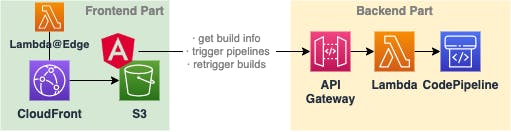
In this article, I want to show you how you can build your own dashboard. Our front will be an Angular app served with CloudFront, and our backend will be powered by Lambda & API Gateway. All of our infrastructure resources will be created with Terraform or Serverless Framework.
And the best thing: as we’re serverless with Lambda and API Gateway and don’t expect much traffic, this will be solely covered by AWS’ free tier.
The steps:
Target Szenario — what do we want to create.
Setting up the backend — designing a Lambda function & API Gateway to expose our build information.
Building our frontend — creating a new Angular app & creating our tiles for each pipeline and job.
Connecting the dots — attaching our frontend with our backend.
Deploying our app — setting up a CloudFront distribution & pushing our static HTML to S3.
Key takeaways & outlook
Target Szenario
In the end, we want to have our own custom frontend which allows us to monitor and control our pipelines. What do we need?
a frontend for displaying everything and communication with our backend
a backend that allows us to receive build information and start new builds
a deployment distribution for our frontend which is protected via some authentication mechanism
Even if it seems like a laborious task, it’s not complex to realize.
Setting up the backend
It’s not much of what we really need:
a Lambda function that accesses CodePipeline via the AWS SDK and retrieves our build information, extracts details we need and returns it.
API Gateway which exposes our function to the internet.
This is an easy task with a little Node.js for the coding part and some templating with Serverless Framework.
Setting up our infrastructure
Start by creating a new Serverless Framework project so we can define our serverless.yml file. If you’ve never done this before, read the getting started guide.
That’s already everything we need for the infrastructure part. Before we can deploy, we need to take care of the actual code.
Working with CodePipeline via the AWS SDK
All code in your Lambda function has always access to the AWS SDK, even if you’re not packaging it with your distribution package. Let’s make use of it to retrieve our build information.
We can now call our from a handler function which we’ll use at our Lambda function and we’re good to go.
const headers = {
    'Content-Type': 'application/json',
    'Access-Control-Allow-Origin': '*',
    'Access-Control-Allow-Methods': '*',
    'Access-Control-Allow-Headers': '*',
}

exports.handler = async (event: any) => {
    const response = await getPipelineData()
    return {
        isBase64Encoded: false,
        statusCode: 200,
        body: JSON.stringify(response),
        headers,
    }
}
Make sure to not miss the headers for the cross-origin access.
Finally, we can transpile our TypeScript to JavaScript and package it inside a zip file. Make sure that your file name matches the one Lambda later expects (dashboard). Also, put your deployment package into the right folder (we assigned deploy).
That’s it. By running sls deploy Serverless Framework will create our CloudFormation Stack and with that our API Gateway, our Lambda function, and all needed IAM roles and policies.
Building our frontend
Let’s create a new angular app and add TailwindCSS to easily style our elements without needing to write any CSS.
Our goal is really simple: just displaying the build information for our jobs in an intuitive way. Afterward, we can extend the UI by adding functionality for starting pipelines or retriggering builds.
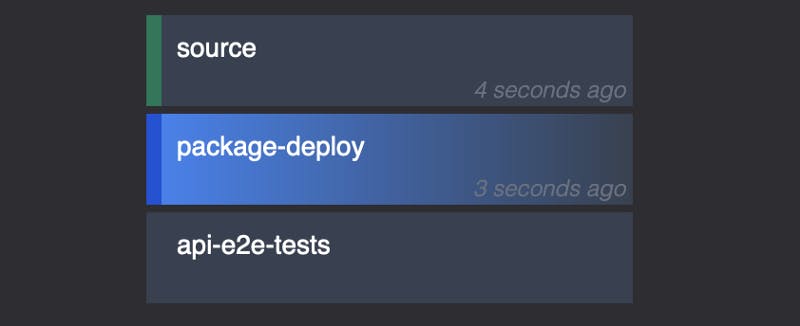
We want to display all of our pipelines, so we can put each one into a separate component. Also, each job will be another component.
service: dashboard

frameworkVersion: '2'

provider:
  lambdaHashingVersion: 20201221
  name: aws
  runtime: nodejs16.x
  region: eu-central-1
  logRetentionInDays: 7
  iam:
    role:
      statements:
        - Effect: "Allow"
          Action:
            - codepipeline:ListPipelines
            - codepipeline:GetPipelineState

package:
  individually: true

functions:
  dashboardApi:
    handler: dashboard.handler
    package:
      artifact: deploy/lambda.zip
    name: dashboard-api
    reservedConcurrency: 5
    memorySize: 128
    timeout: 10
    events:
      - httpApi:
          path: /api/{proxy+}
          method: GET
As we’re using Tailwind, there’s no additional styling with CSS needed.
Looking at the logic part, it’s also not much we need to do:
retrieving our data from our API & pushing it via
@Input()into our pipeline components, which will then pass each of the job's data further down to the jobadding
getJobClass,openPipelineView,getStatusBarClass,getJobName,getLastUpdate
We’ll retrieve our pipeline data from our Lambda function via its API Gateway domain in the next step, but we can already work with the DTO we expect.
Afterward, we can just finish writing our needed functions
getJobClass— mapping the current job status to Tailwind class that indicates the status via a color.getStatusBarClass— same as the one before, but for the left small line.getLastUpdate— formatting the timestamp we received for the last state update of the job into a relative format.
Connection the dots
Let’s create a new service to retrieve our pipeline data with ng g s dashboard-service. We can use the HTTP client provided by Angular and directly re-use the PipelineDto we’ve created as a response at our Lambda.
The backend URL can be either found after deploying with Serverless Framework or if you have a look at AWS API Gateway.
Deploying our app
Now we’re almost done. The last part will be creating our CloudFront distribution and S3 bucket and finally uploading our built frontend distribution.
We can do this easily with Terraform. If you’ve never worked with it before, read the Getting Started guide which walks you through the installation and the basic concepts. With Terraform, you can work with all Cloud providers in a single language. It really powerful and you’re able to structure your code in a very clean way. For more complex projects, which are needing more than the basic Serverless components like Lambda and API Gateway, I prefer to work with Terraform. The best about this: you can marry them easily.
Creating our CloudFront distribution and S3 bucket
There are three steps we need to take
Creating our S3 bucket
Creating our CloudFront distribution
Allowing CloudFront’s Identity to access our S3 bucket
Let’s quickly set this up.
Now we can apply Terraform to create our resources. Afterward, we can just upload our built Angular distribution to S3 via the AWS CLI.
# uploading all files except for the index.html
aws s3 sync dist/dashboard s3://custom-build-dashboard \\
   --sse --delete --cache-control no-cache --exact-timestamps \\
   --exclude "index.html"

# uploading the index HTML
aws s3 cp dist/dashboard/index.html s3://custom-build-dashboard \\
   --sse --cache-control "max-age=0"
We should now be able to access our dashboard via the CloudFront URL that you can find on your distribution list.
Authentication with Basic Auth and Lambda@Edge
Currently, we’re not exposing anything but our build information. But maybe we don’t want anybody to access our board if he just got the URL. A simple solution is to use basic auth to restrict our site to be only accessible when sending the right credentials via the Authorization HTTP header.
That can be achieved by adding a Lambda@Edge or CloudFront Function. There are three different types of associations you can attach to your CloudFront distribution:
viewer request— this one will always be executed when a client requests your domain. This is very useful for validating authorization preconditions.origin request— will be executed after the viewer request, but only if there’s no caching active or no cached response available so that CloudFront has to retrieve the response from the origin. In our case, S3 is the origin. You can use this to modify the origin request, e.g. dynamically routing to different origins.origin response— after an origin request was made, but before the response is returned to the client. You’ve got no access to the actual response that was retrieved from the origin, but you can overwrite it.
For our cases, the viewer request is the best fit as we’d like to have authorization checks for all requests.
That’s all we need for new resources. We can now attach the function inside our default_cache_behaviour block in our CloudFront distribution resource:
default_cache_behavior {
  lambda_function_association {
    event_type = "viewer-request"
    lambda_arn = aws_lambda_function.edge.qualified_arn
  }
  # [...]
}
Finally, let's add the actual logic for the function inside viewer-request.js:
There we go! You can now configure authUser and authPass like you wish. If your requesting your domain, you’ll be asked for your credentials. I like to use a browser plugin like Requestly to always add the Authorization header with my credentials for specific domains so I won’t have to re-enter the credentials after each cache expiration.
Key takeaways & outlook
Building your own custom frontend is not a tedious task, but can be a fun side project, also for learning some AWS.
Feel free to extend your dashboard with anything you can think of, like triggering the whole pipeline, restarting builds, and disabling transitions. There’s nothing you can’t do as your Lambda function can have full access to CodePipelines and CodeBuilds API.
I hope you enjoyed it and learned something new!