


AWS S3 Sync - An Extensive Guide
Learn all about AWS S3 sync - covering download, upload, synchronize buckets, file selection patterns, dry-run, and more - examples included.


Synchronizing files between different destinations is a regular task for every developer. In the AWS world, a lot of storage evolves around S3 as it's the most common object storage due to its high availability, durability, and fair pricing.
The AWS CLI offers the aws s3 sync command which allows you to easily copy files between your local machine and S3 - in both directions - as well as directly between different buckets.
The command also brings a lot of additional flags and options to meet all your synchronization requirements.
Let's explore its powers in the following chapters!

Getting Started
💡 If you've already installed the AWS CLI locally, please skip this part and directly jump to the basics.
If not, follow the steps to the AWS CLI installed and configure your credentials on your local machine. This is a precondition to getting the sync command working. We're not covering AWS profiles or Multi-Factor authentication usage but only the minimal setup via an AWS Access Key ID and Secret Key. As a general reminder: please do not use your root credentials for your daily work, neither for accessing the console interface nor using the AWS APIs via any tooling. Create a dedicated IAM user with restricted permissions, enable MFA for your root user, delete any Access Keys, and lock the credentials away safely.
Installation of the AWS Command Line Interface
Install the latest version of the AWS CLI by following the documentation for your operating system.
If you're running macOS, you can also just simply install the CLI via homebrew by running brew install awscli.
The AWS CLI is a unified tool to manage your AWS resources programmatically. You can control any service directly from your terminal and also automate steps through scripts.
⚠️ The AWS CLI is not an alternative to an Infrastructure-as-Code tool. While you can automate the creation of resources, you're not relying on a fixed state that reflects the currently existing resources in your account. Only use the CLI for small tasks, but don't try to build the infrastructure of your application ecosystem with it - use tools like Terraform, the AWS CDK, CloudFormation, or comparable others. If you're interested, read more about the evolution of infrastructure tooling on AWS.
Configuration
For accessing the AWS API through our newly installed tool, we need to set up our account details. Go to your Security Credentials page.

Click on create access key to create a new Access Key ID and Secret Access Key. Note down both before closing the creation window, as the Secret Access Key can't be retrieved afterward!
Now go back to your terminal and run aws configure and follow the steps to enter your keys, your default region (e.g. eu-west-1) and the default output format (e.g. json).
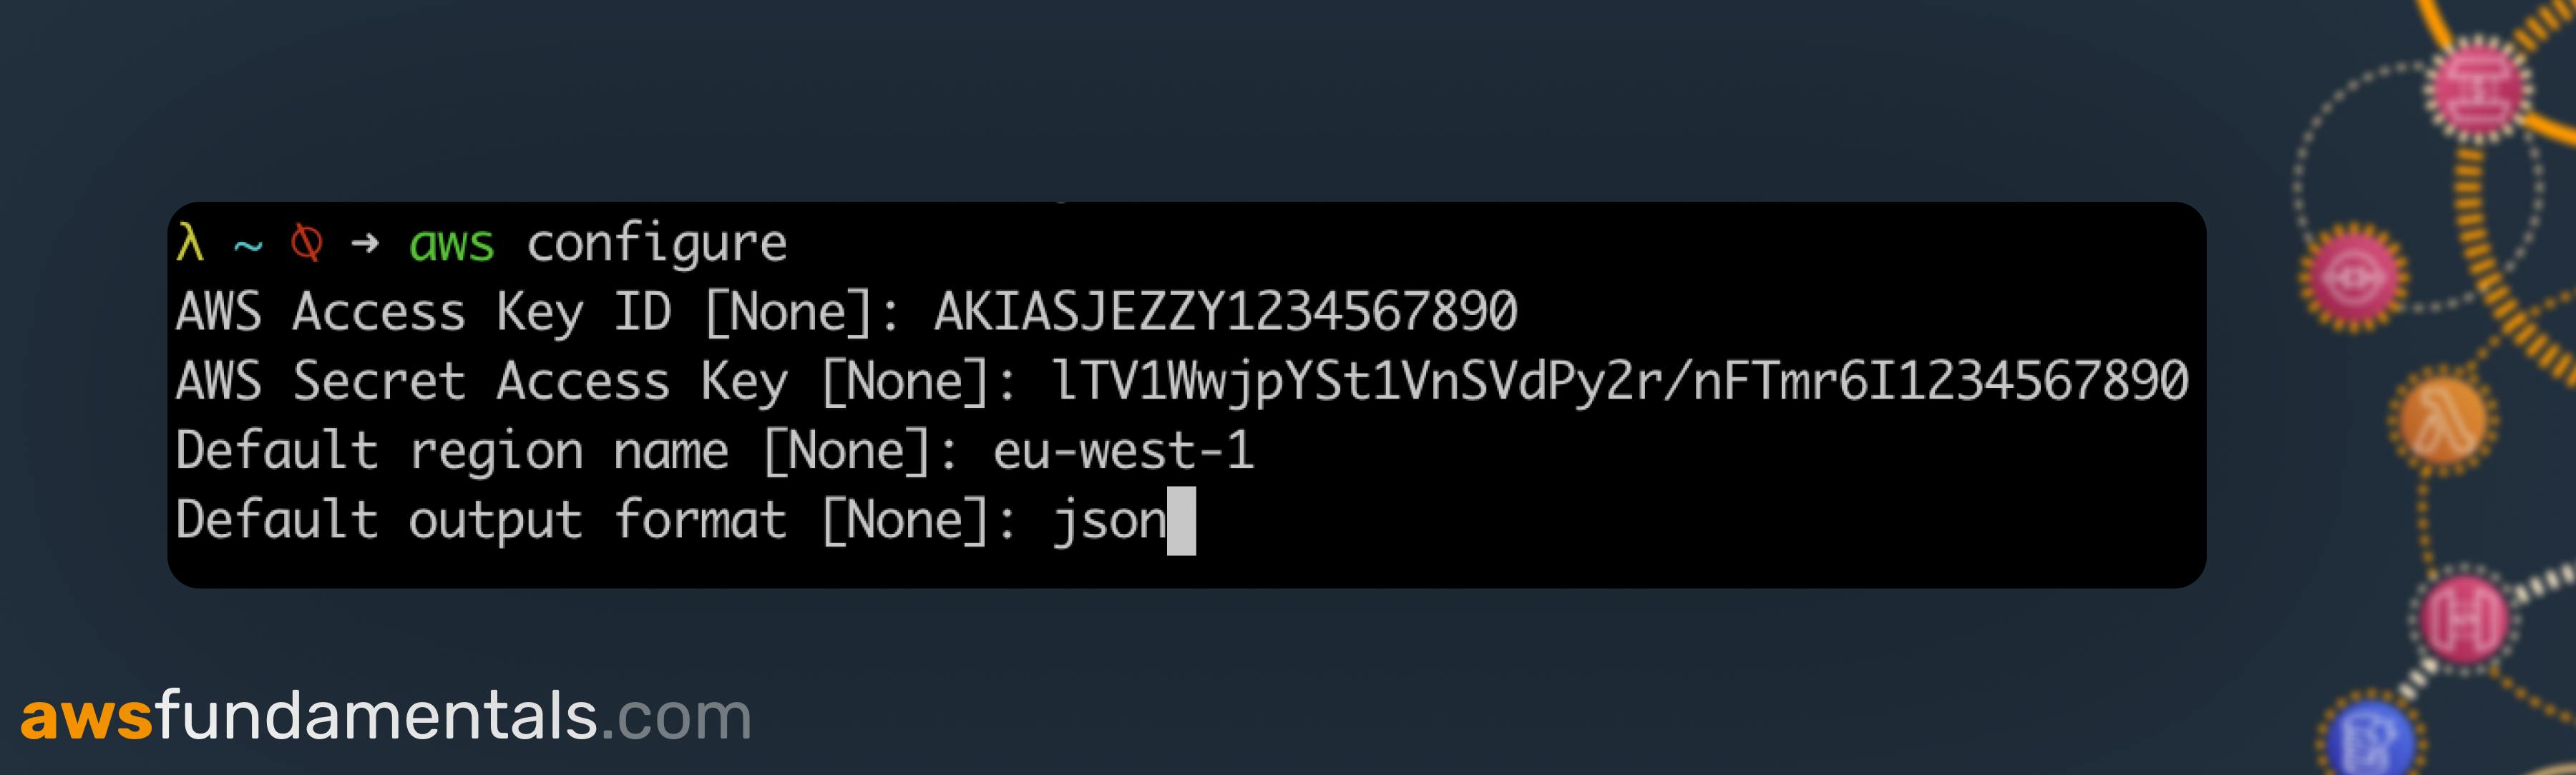
Let's validate that everything is working as expected by running aws sts get-caller-identity. If you don't face an error but see your unique 12-digit account identifier, we're set!
The Basics
The AWS S3 Sync command recursively copies files between two destinations, which can be either a bucket or a directory.
This is the general syntax - without any further flags and options that will we explore later on:
aws s3 sync <source> <destination>
That's all we need for now. Let's explore common examples.
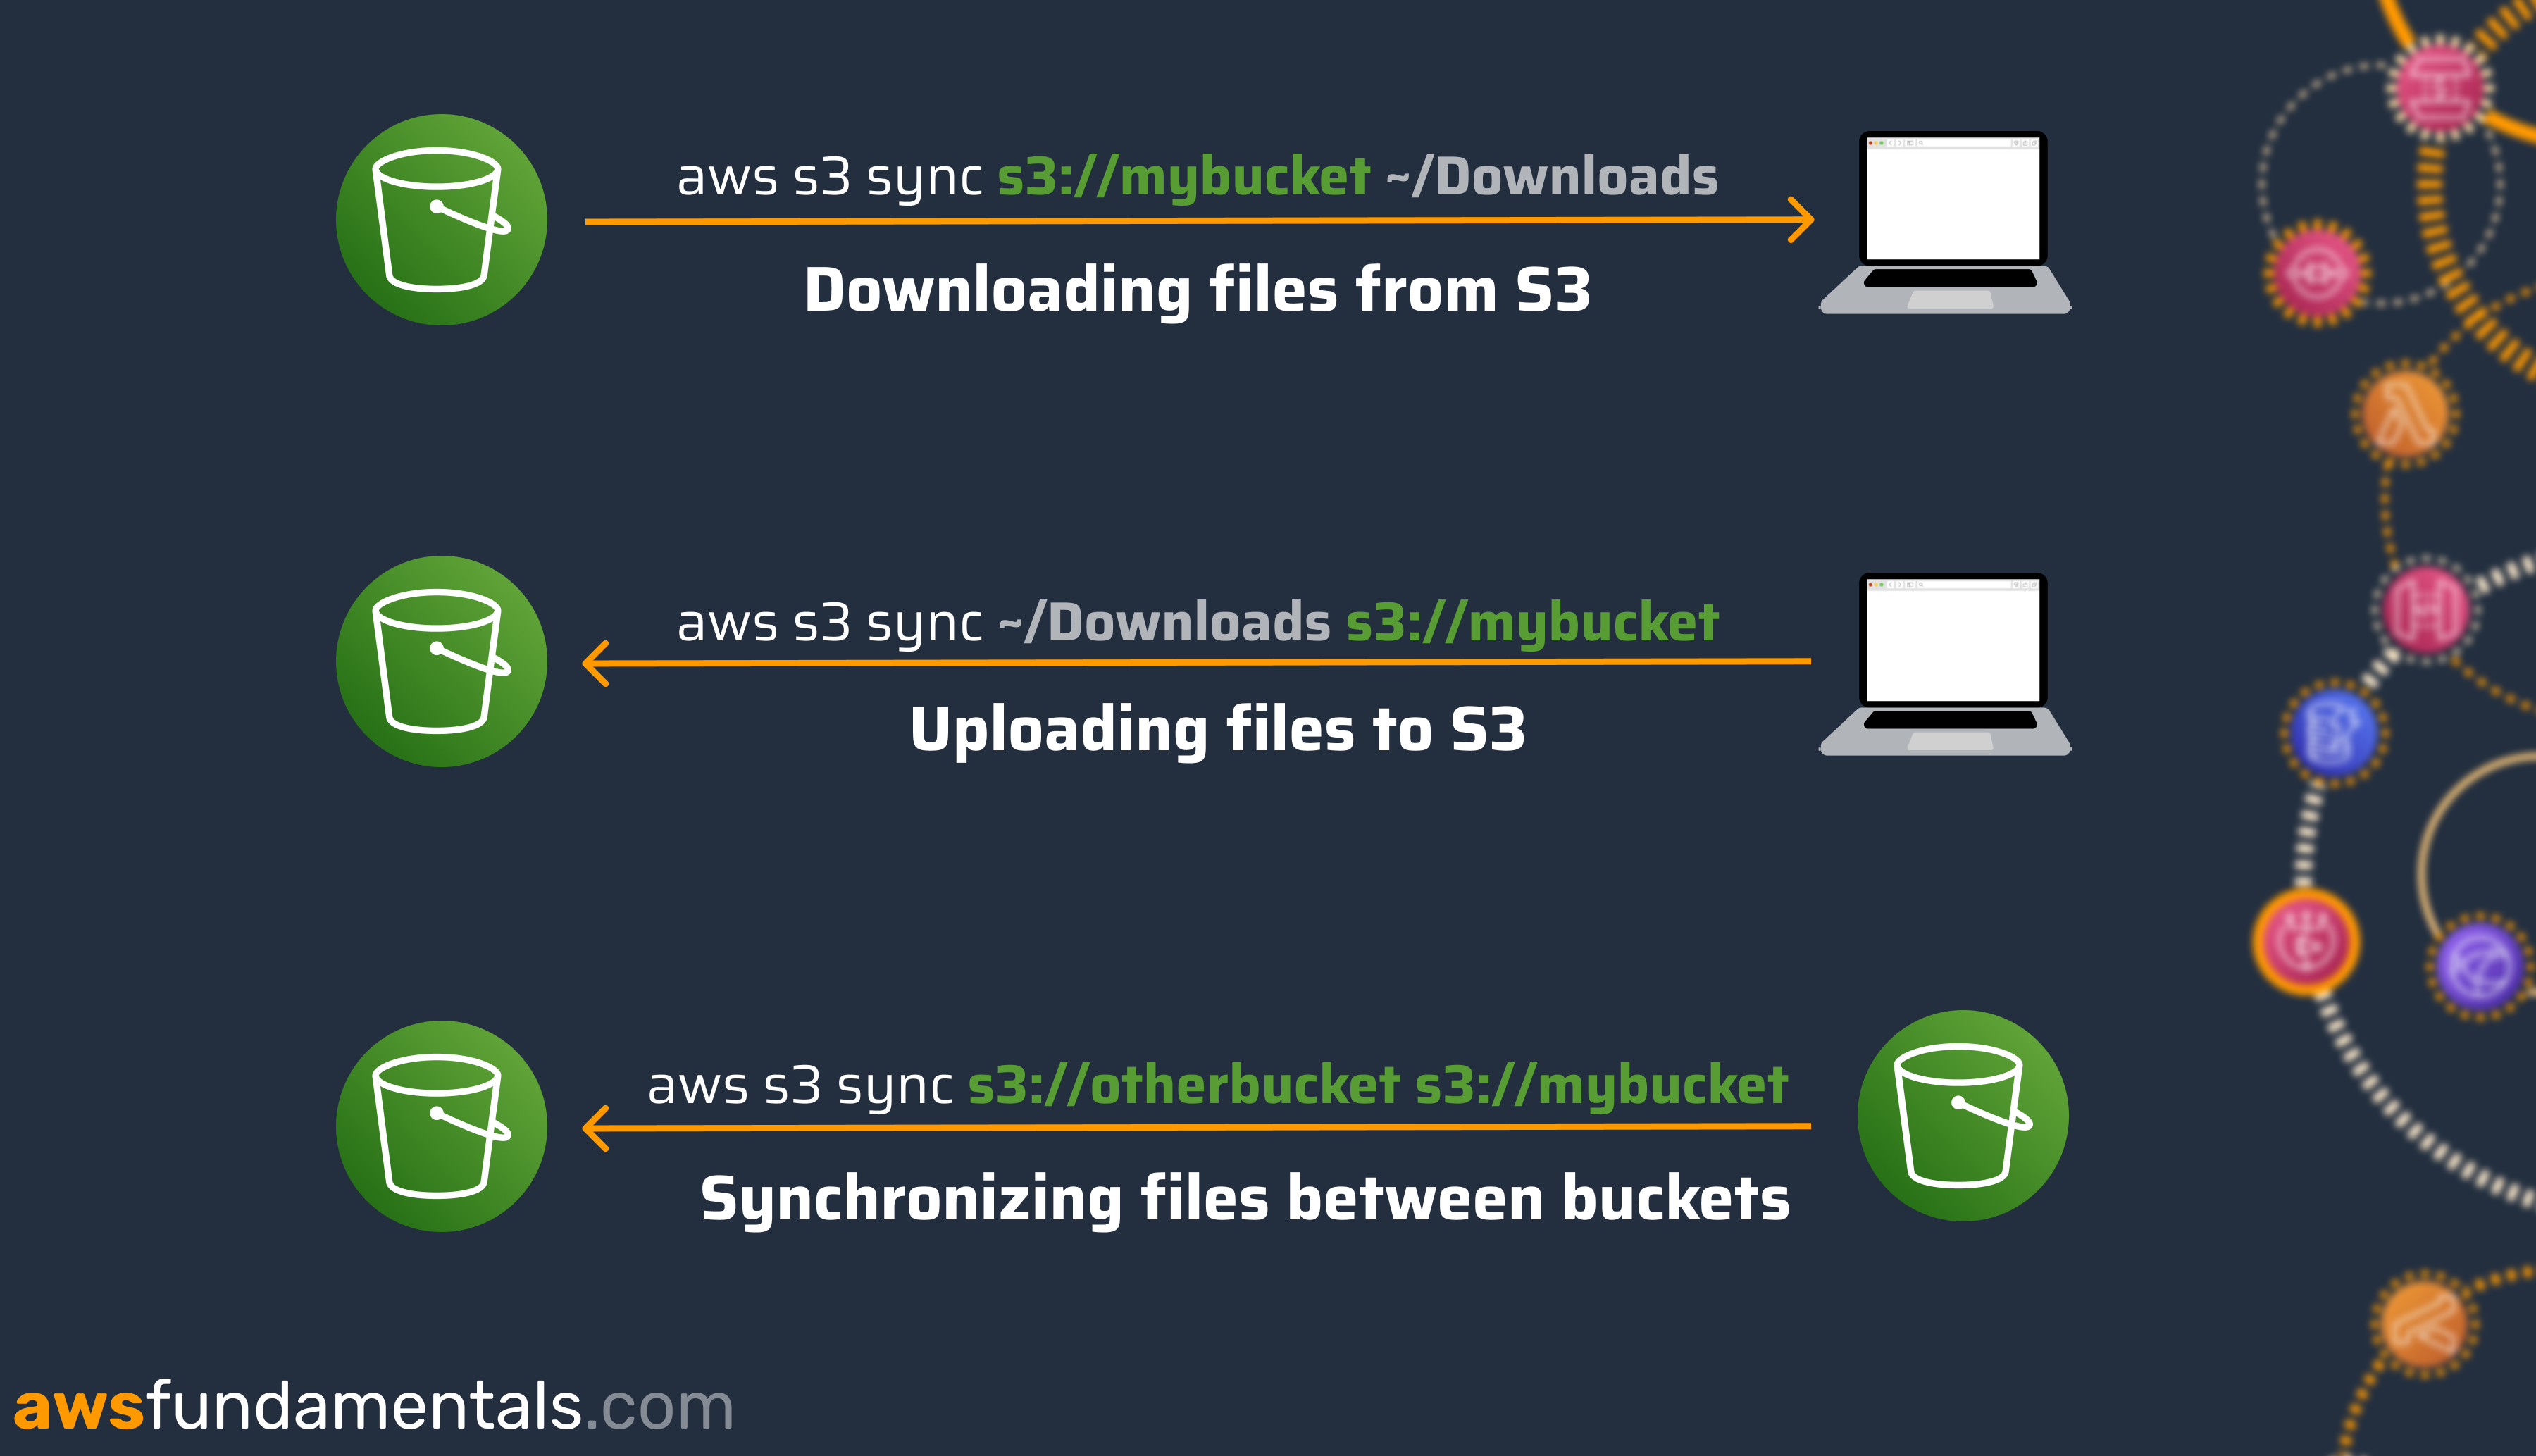
Downloading files from a bucket to Local
We can download all files from a specific folder to our local machine. If you're adding the --recursive flag, the sync command will also download nested folders and their files.
aws s3 sync s3://mybucket ~/Downloads --recursive
The S3 sync command will skip empty folders in both upload and download. This means that there won't be a folder creation at the destination if the source folder does not include any files.
Uploading files to a bucket
This also works in the other direction by switching our parameters.
aws s3 sync ~/Downloads s3://mybucket
By default, AWS S3 sync will upload all files from our directory to the target directory. Already existing files will be overwritten, or if versioning is enabled, will be saved as a new version.
Syncing files between buckets
You can also copy files between two buckets.
aws s3 sync s3://source-bucket s3://target-bucket
This removes the intermediate step of explicitly downloading the files to your local machine from the source bucket and only then uploading them afterward to your target bucket.
The Delete Flag
Maybe you want to exactly mirror the state of a directory, meaning deleting files which do not exist at your source. This can be achieved by adding the option --delete.
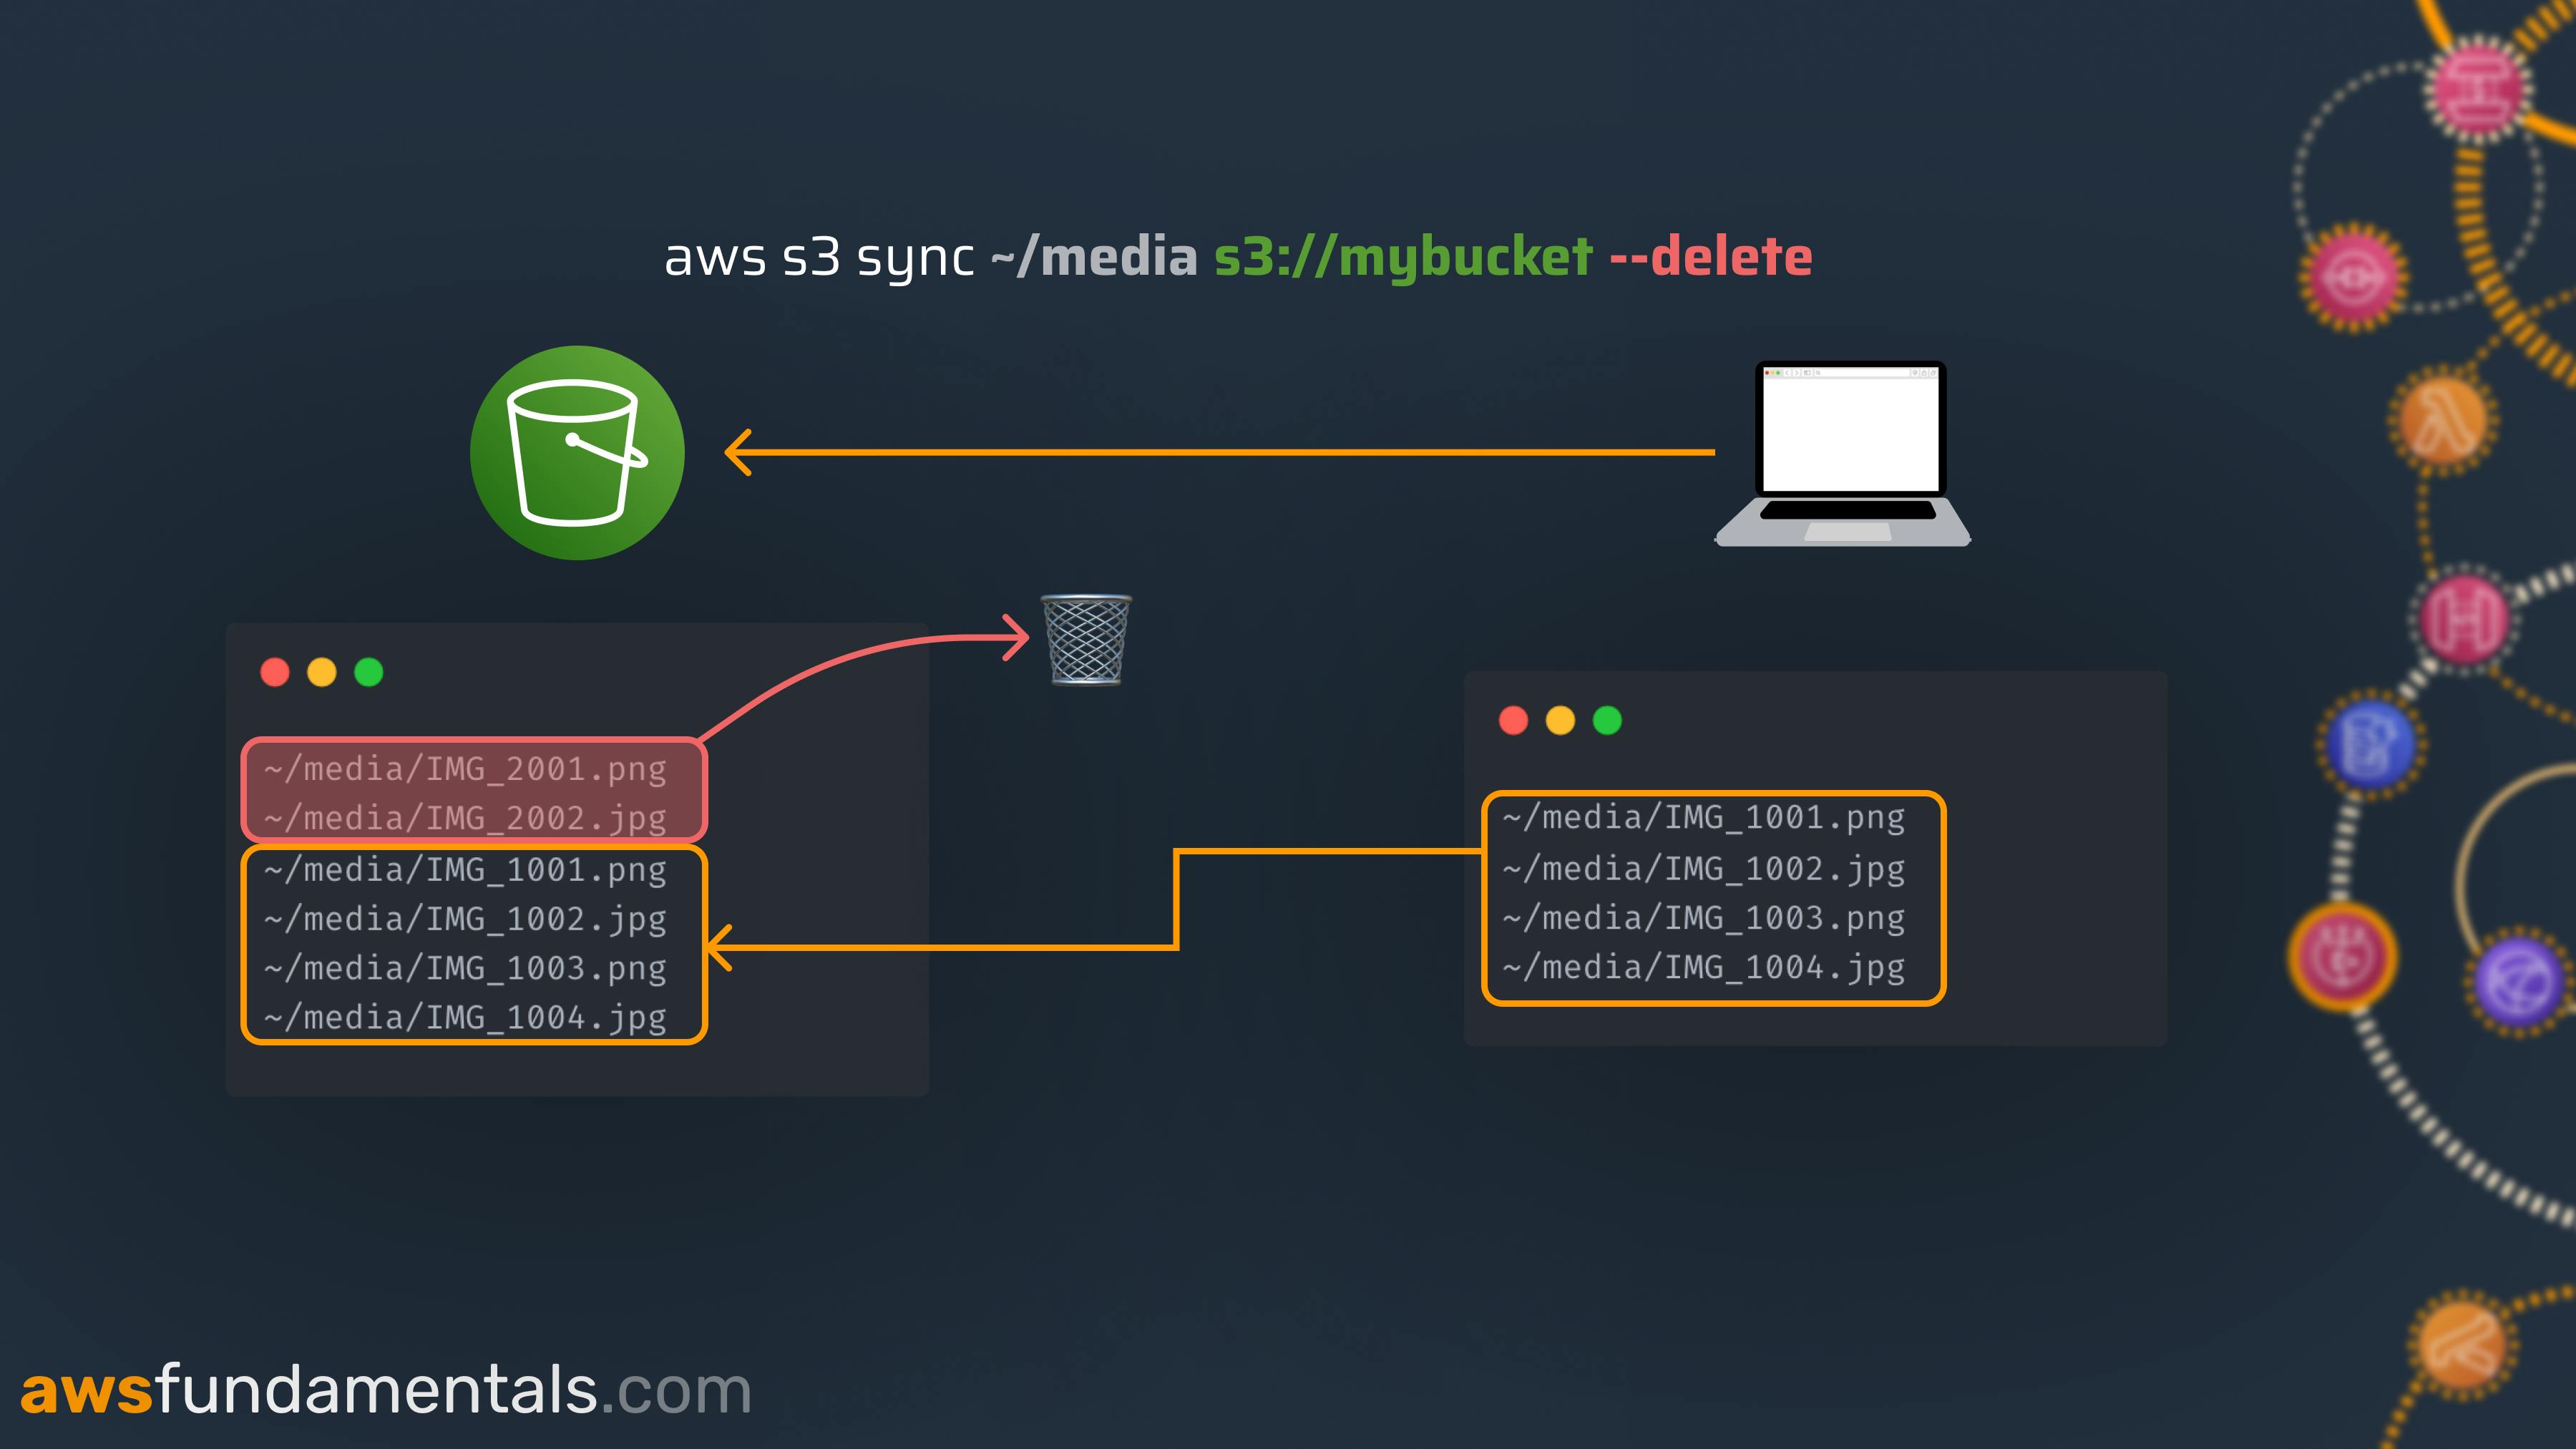
The sync command will take care and delete files that exist at the target destination, but not at your source.
⚠️ Be careful with this command as you can easily wipe files from your buckets, which then won't be recoverable. Always preview the sync command's actions by doing a dry-run, which we'll talk about in one of the following paragraphs.
File Inclusions & Exclusions
Maybe you don't want to sync a whole directory, but only specific files. This can be achieved by using exclude and include filters.
--exclude <pattern>excludes files that match the pattern--include <pattern>skips exclusion for files that match the pattern
You can use both options together and multiple times. Remember that by default all files are included.
aws s3 sync ~/photos s3://mybucket \
    --exclude '*' \
    --include '*.png' --include '*.jpg'
We'll at first exclude all files and then add all PNG and JPG files back to the sync list.

💡 Be aware that the order of the options does matter! The following command is not equal to our first example:
aws s3 sync ~/photos s3://mybucket \
    --include '*.png' --include '*.jpg'
    --exclude '*'
This will now at first include all PNG and JPG files, but will afterward exclude everything from the synchronization.
Pattern Symbols
There's currently no support for UNIX-style wildcards. What's supported by the sync command is:
*to match everything?to match any single character[value]to match any character invalue[!value]to match any character that is not invalue
The last pattern comes in handy. You can avoid having the leading exclude for all files, by just reversing the pattern.
# exclude all but PNG files
aws s3 sync ~/photos --exclude '[!*.png]'
Dry Run
Running the sync command comes with a risk. You could overwrite or delete files (remember the --delete flag) that may not be recoverable if versioning is disabled.
That's why you can dry-run your command via the --dryrun option. It will preview the commands that would have been executed.

This is a neat option to verify which files will be copied and/or deleted. Use this when you're not 100% sure about the results of your command before accidentally deleting files that can't be recovered.
Quiet
Executing the sync command for directories with a large number of files will result in excessive terminal logs. You can restrict the CLI to only show errors by passing --quiet. Especially if you're running synchronization commands within build processes and you're not interested in any detailed debug output, you can reduce the noise drastically.

Advanced Options
We've covered all the basic options for AWS S3 sync and that's maybe all you need in your daily business. But nevertheless, there are a lot more useful settings when copying files that go beyond the average usage patterns.
Let's explore some of the most useful.
Server-Side Encryption
Specify the server-side encryption mode (SSE) of files that are copied and finally stored at S3. This is either for the cases where you didn't specify encryption by default for your bucket or if you want to provide dedicated encryption settings for specific files, e.g. by using certain customer-managed KMS keys.
--sse-c <value>- define how files should be encrypted, either withAES256oraws:kms(customer-managed KMS key). Skipping the value will always fallback toAES256--sse-c-key <value>- if you're using SSE with a customer-managed key, you need to provide the key to use via this option.
Content Type
You can explicitly define the content type of the files that are copied to S3 by passing --content-type <value>.
Generally, this is not needed as S3 will take care of guessing the correct mime type by inspecting the file suffixes. By using this option, those guessing will be deactivated. This comes in handy if you're syncing files that may have uncommon file suffixes but you want S3 to return the proper Content-Type header when files are received via a public URL or through CloudFront.
Storage Classes
You can directly select the target storage class for the files to copy by using --storage-class. Valid selections are:
STANDARD- S3 StandardREDUCED_REDUNDANCY- S3 Reduced RedundancySTANDARD_IA- S3 Standard Infrequent AccessONEZONE_IA- S3 One-Zone Infrequent AccessINTELLIGENT_TIERING- S3 Intelligent TieringGLACIER- S3 GlacierDEEP_ARCHIVE- S3 Glacier Deep ArchiveGLACIER_IR- S3 Glacier Instant Retrieval
By default, the S3 sync command will always use the standard class.
Choosing a storage class has to depend on the data access, resiliency, and cost requirements of your data. AWS provides extensive documentation about all storage classes and descriptions of when to use them. It's quite worthy exploring your options to save money for large storage requirements.
Cache-Control
Define the caching behavior of the objects stored in S3 via --cache-control <value>. This is also respected if you're serving your content via CloudFront, meaning CloudFront's edge locations won't cache objects longer than the specified duration.
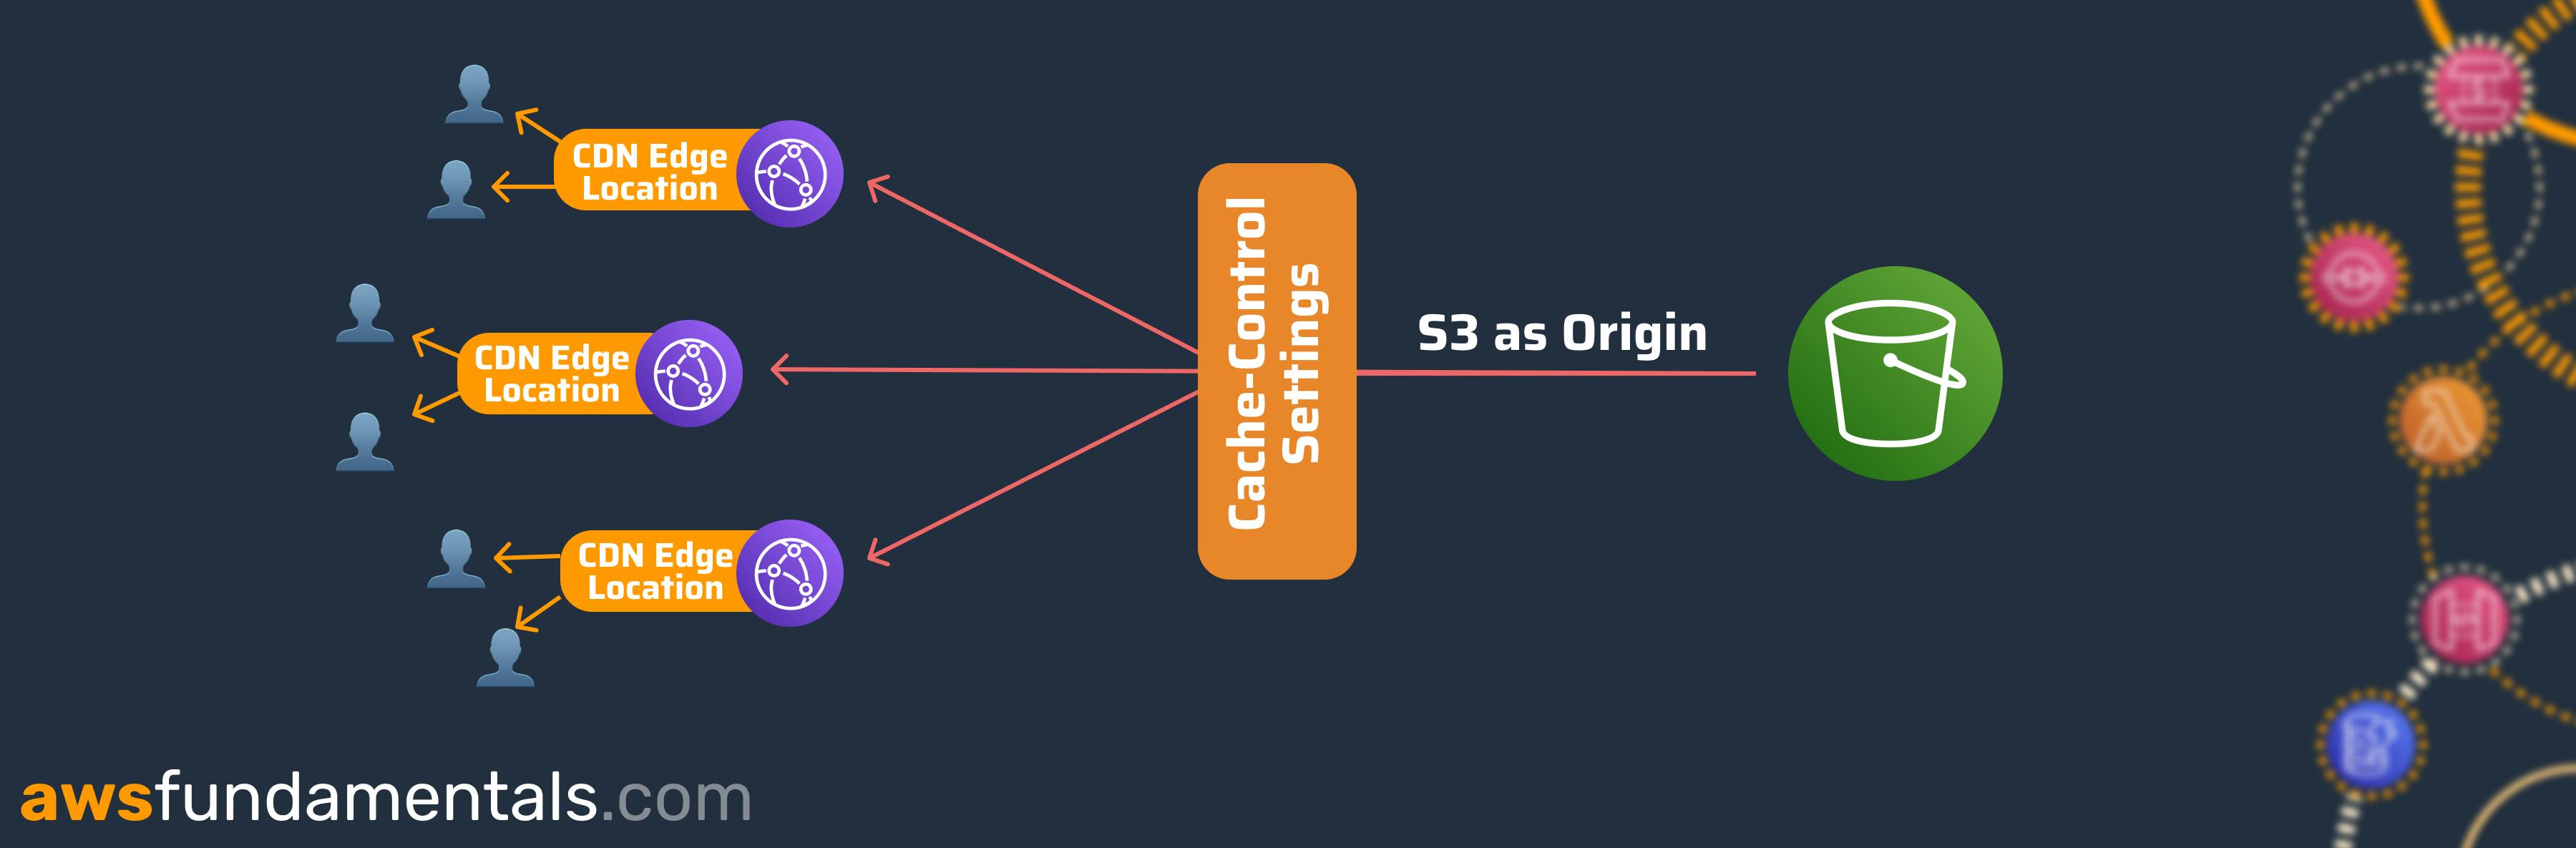
If you're synchronizing objects to S3 which do get updated a lot, apply a proper cache-control setting so that clients receive the latest content quickly. Besides specifying seconds you can also submit no-cache to inform clients and intermediate systems that objects should not be cached at all.
Canned ACL
Amazon S3 supports predefined grants which can be assigned to objects in your buckets via --grants. This includes, among other things:
private- No one else except the owner of the bucket has any rights.public-read- Anyone gets access.authenticated-read- All AWS authenticated users - including from different accounts - get read access.
⚠️ You need the s3:PutObjectAcl permission to perform this action. Also, if you've restricted your bucket from all external access, ACLs on object level like public-read will be ignored.
Tooling: aws-shell for Auto-Completion
The AWS toolbox doesn't stop with the AWS CLI. For auto-completion of commands, I recommend installing aws-shell which can also be found in the AWS documentation of the CLI or on Github.

With aws-shell, you don't need the aws prefix anymore and you're less likely to jump back to the documentation, as it will guide you with auto-completion and options as you type. It also supports server-side auto-completion for resources such as EC2 instance IDs, DynamoDB table names or S3 bucket names. Most importantly: it also covers fuzzy-matching so you can search for parts of a command to get a match.
# looking for ec2 describe-instances
aws> ec2 descinst
And there's more: aws-shell will inline the current documentation as you type commands.
Personally, it's a must-have for every dedicated developer using AWS.
Final Words
We've covered a lot in this article about what's possible with AWS S3 sync. Let's recap this quickly:
Uploading and downloading files to and from an S3 bucket
Synchronizing files between two buckets
Filter patterns via the exclude and include options to select which files we want to copy
Mirroring directories and deleting files that are not part of the source directory with the delete option
Previewing our sync commands actions via the dry-run flag
Strictly setting content types for our files
Assigning cache-control values to restrict the time objects can be cached on the client side or at CloudFront
How to assign storage classes to objects
Applying canned ACLs to define access control levels
Server-side encryption modes, both with AWS and customer-managed keys
Making use of aws-shell for auto-completion, fuzzy-searching commands, and inlining documentation for easier use of the CLI
That's it - and it's a lot! We also saw that a single AWS CLI command can become quite powerful. I hope you learned something new!
If you're interested in learning all the AWS fundamentals, we'd love to have you as a subscriber.